This page is about standard dashboard filters. To learn about dashboard cross-filters, visit the [Cross-filtering dashboards](https://docs.cloud.google.com/looker/docs/cross-filtering-dashboards.md.txt) documentation page.
## Understanding dashboard filters
Dashboard filters let a viewer narrow a dashboard's results to only the data the viewer is interested in. Dashboard filters can apply to all tiles on a dashboard, or to only one dashboard tile.
When viewing a dashboard, a user can [temporarily update dashboard filter values](https://docs.cloud.google.com/looker/docs/viewing-dashboards.md.txt#temporarily_changing_filter_values_on_dashboards), which doesn't affect any other users. This differs from filters that are part of a query underlying a dashboard tile; viewers can't change these filters unless they have permission to [edit the tile](https://docs.cloud.google.com/looker/docs/editing-user-defined-dashboards.md.txt#editing_tiles) or to [**Explore from Here**](https://docs.cloud.google.com/looker/docs/viewing-dashboards.md.txt#dashboard_(beta)_tiles).
To make permanent changes to filters that all users will see, or to add or delete filters, you must have the [**Manage Access, Edit**](https://docs.cloud.google.com/looker/docs/organizing-spaces.md.txt#folder_access_levels) access level for the dashboard and be in [edit mode](https://docs.cloud.google.com/looker/docs/editing-user-defined-dashboards.md.txt#entering_edit_mode_in_dashboards_(beta)).
### Dashboard filter override behavior
Filters on a dashboard can be applied at different levels. When multiple filters affect the same field, Looker determines precedence according to the following hierarchy (from highest to lowest precedence):
1. **[Cross-filters](https://docs.cloud.google.com/looker/docs/cross-filtering-dashboards.md.txt)** (highest precedence): created when viewers interact with data points on cross-filter-enabled dashboard tiles.
2. **[Visualization-level filters](https://docs.cloud.google.com/looker/docs/filters-user-defined-dashboards.md.txt#filters-on-visualization-tiles)**: placed directly on a specific visualization tile.
3. **Dashboard-level filters**: applied at the dashboard level across one or more tiles.
4. **Query-level filters** (lowest precedence): configured in the tile's underlying query (Explore or Look).
The override behavior among these filters is determined as follows:
- **Same field override** :
- When a visualization-level filter and a dashboard-level filter are applied to the same field, the visualization-level filter overrides the dashboard-level filter for that tile. Only the visualization-level filter value is applied to that tile.
- When a dashboard-level filter or a visualization-level filter, along with a filter in the tile's underlying query, is applied to the same field, the dashboard-level or visualization-level filter overrides the query filter. Only the higher-level filter value is displayed and applied.
- Cross-filters override visualization-level, dashboard-level, and query-level filters on the same field.
- **Custom expressions** : If the underlying query uses a [custom expression](https://docs.cloud.google.com/looker/docs/filtering-and-limiting.md.txt#custom-filters), higher-level filters don't override fields in the custom expression filter, regardless of the columns that are being referenced. In this case, both the higher-level filter and the query filter are displayed and applied.
- **Complex filters (`OR` conditions)** : If the underlying query's filter grouping contains at least one `OR` condition, the filter is treated as a complex filter, and higher-level filters don't override any field that's referenced in that query filter. Both filters are displayed and applied.
In summary, a filter on the underlying query is treated as a *custom filter* that higher-level filters will never override if one of the following conditions is true:
- The innermost `AND`/`OR` grouping contains at least one `OR` condition.
- The filter contains a custom expression.
### Dashboard filters and LookML
If a model, an Explore, or a field uses the [`label` (model)](https://docs.cloud.google.com/looker/docs/changing-explore-menu-and-field-picker.md.txt#label_(model)), [`label` (Explore)](https://docs.cloud.google.com/looker/docs/changing-explore-menu-and-field-picker.md.txt#label_(explore)), or [`label` (field)](https://docs.cloud.google.com/looker/docs/changing-explore-menu-and-field-picker.md.txt#label_(field)) parameter, respectively, to change its name in the **Explore** menu or field picker, the name given in the `label` parameter is used in the [**Add Filter** window](https://docs.cloud.google.com/looker/docs/filters-user-defined-dashboards.md.txt#the_add_filter_window).
If you are a LookML developer and are in [**Development Mode**](https://docs.cloud.google.com/looker/docs/dev-mode-prod-mode.md.txt), you can create a dashboard filter on a field that appears only in your Development Mode version of a model, but the filter won't function as expected when you exit Development Mode or when the filter is used by other users. Similarly, if a filter field is deleted or renamed after the filter is created, the filter won't function as expected.
## Adding dashboard filters
To get started, make sure that the dashboard is in [edit mode](https://docs.cloud.google.com/looker/docs/editing-user-defined-dashboards.md.txt#entering_edit_mode_in_dashboards_(beta)) and that you have at least one query tile or Look-linked tile. Select **Filters** in the top toolbar, and then select **Add Filter**.
> [!IMPORTANT]
> **Important:** If you edit a [dashboard with tabs](https://docs.cloud.google.com/looker/docs/tabbed-dashboards.md.txt), every filter will appear on every tab in edit mode. Once you exit edit mode, a filter will only appear on a tab if it is applied to at least one tile on that tab.
> [!TIP]
> **Tip:** To add a filter directly to an individual visualization tile rather than across the dashboard, see the [Filters on visualization tiles](https://docs.cloud.google.com/looker/docs/filters-user-defined-dashboards.md.txt#filters-on-visualization-tiles) section on this page.
An **Add Filter** window appears next.
### The Add Filter window
The **Add Filter** window appears pre-populated with [fields](https://docs.cloud.google.com/looker/docs/lookml-terms-and-concepts.md.txt#dimension_and_measure_fields) (dimensions or measures) from any [Explores](https://docs.cloud.google.com/looker/docs/creating-and-editing-explores.md.txt) that were used in the creation of this dashboard's tiles.
For example, the following **Add Filter** window shows the Explores that are used in the dashboard's tiles: the **Flights** Explore from the **E Faa** model and the **Order Items** Explore from the **MB ecommerce_demo** model.
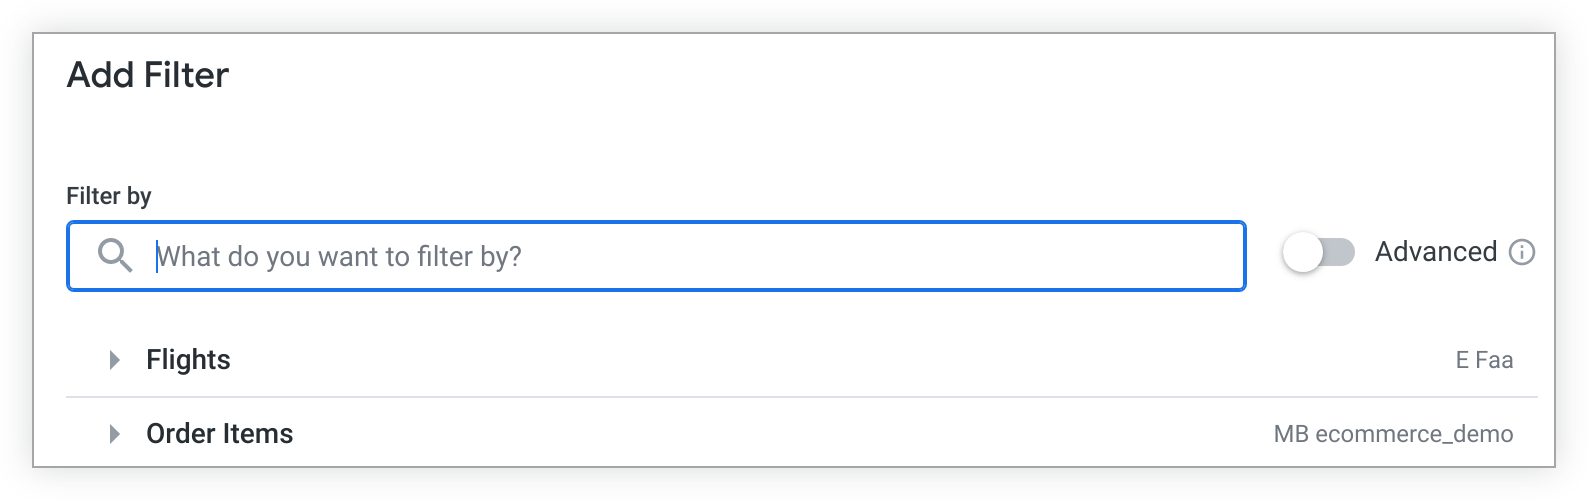
Select the arrow next to an Explore to show the Explore's views. Each view can then be expanded to reveal the view's fields.
To filter on a field from one of these Explores, you can use the **Filter by** dialog to search for fields or manually enter a field name. You can also click a field name, such as **Order ID** , to add it to the **Filter by** dialog.
If you select a field that is already being used by another filter, Looker will alert you. While you can still create the filter, you cannot apply multiple filters that use the same field to the same dashboard tile.
If you want to create a filter on a field from an Explore that is not used in the dashboard, see the [**Advanced filters**](https://docs.cloud.google.com/looker/docs/filters-user-defined-dashboards.md.txt#advanced_filters) section on this page.
> [!TIP]
> **Tip:** If you have already selected a field in the **Filter by** dialog of the **Add Filter** window, selecting the **Advanced** switch results in no changes to the **Add Filter** window and an advanced filter is not initiated.
Once you've selected the field you want to filter by, select **Add**.
### Advanced filters
Advanced filters let you create dashboard filters using fields that are outside of the [Explores](https://docs.cloud.google.com/looker/docs/creating-and-editing-explores.md.txt) used to create tiles on the dashboard. In the **Add Filter** window, enable the **Advanced** switch to use advanced filters. This updates the **Add Filter** window with options to select a [model](https://docs.cloud.google.com/looker/docs/lookml-terms-and-concepts.md.txt#model), an [Explore](https://docs.cloud.google.com/looker/docs/lookml-terms-and-concepts.md.txt#explore), and a [field](https://docs.cloud.google.com/looker/docs/lookml-terms-and-concepts.md.txt#dimension_and_measure_fields) with which to create the filter:
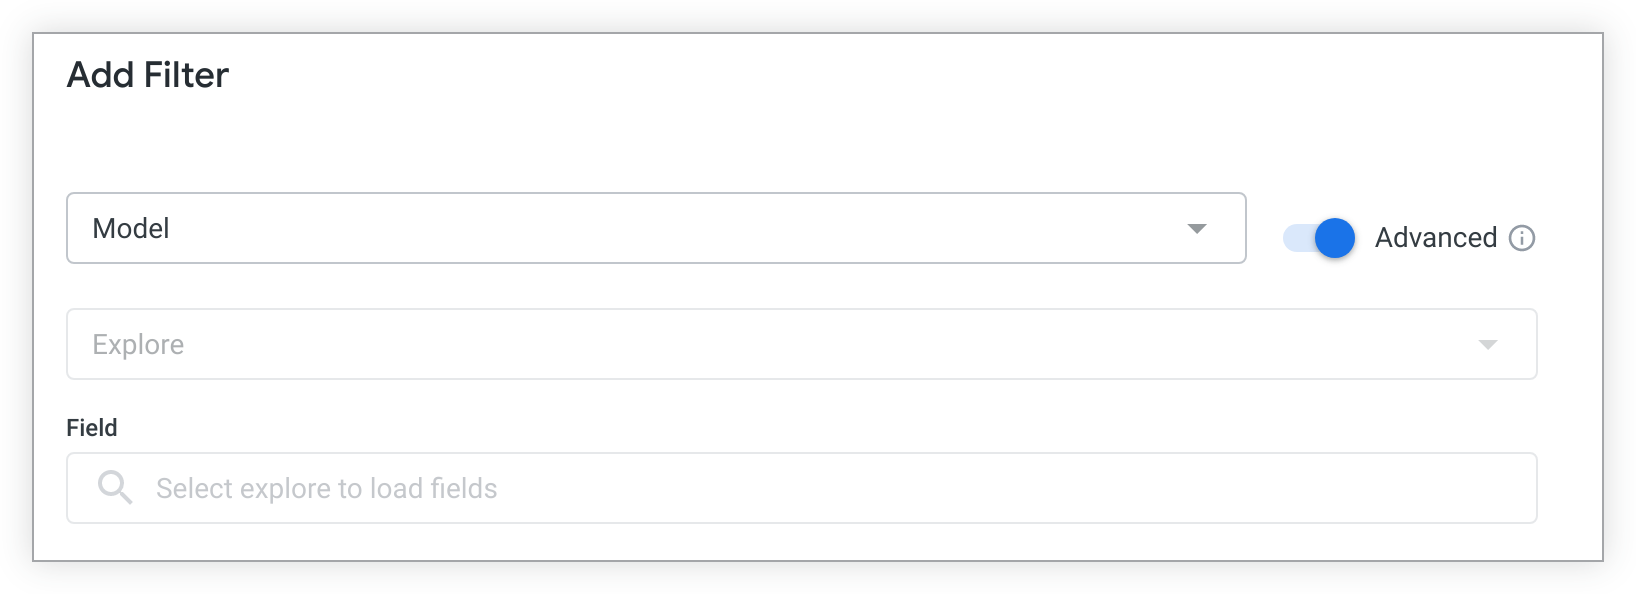
First, select a model name from the drop-down **Model** menu. The drop-down menu contains all LookML models that you [have access to](https://docs.cloud.google.com/looker/docs/admin-panel-users-roles.md.txt#model_sets).
Once a model is selected, the **Explore** dialog populates with a drop-down menu of all the **Explores** that are present in the selected model.
Once the model and the Explore are selected, the fields that are available in that Explore will populate the **Add Filter** window. You can use the search bar to find the field that you want to filter by, or you can select a field name.
Once you've selected the field you want to filter by, select **Add**.
### Customizing filter configuration
Once you select a filter field and select **Add** , the **Add Filter** window shows a variety of customizable settings on the **Settings** and **Tiles To Update** tabs.
> [!NOTE]
> **Note:** If your dashboard has tabs, you can apply filters to dashboard tiles that are on different tabs on the [**Tiles To Update** tab](https://docs.cloud.google.com/looker/docs/filters-user-defined-dashboards.md.txt#tiles_to_update). See the [Apply filters to tiles on different tabs](https://docs.cloud.google.com/looker/docs/tabbed-dashboards.md.txt#apply-filters) on the [Tabbed dashboard](https://docs.cloud.google.com/looker/docs/tabbed-dashboards.md.txt) page for more details about adding filters to dashboards with tabs.
#### The **Settings** tab
- **Title**: Enter the title of the filter as you want it to appear on the dashboard. The title option is pre-populated with the name of the filter-by field.
- **Control** : Select from a list of control types, which vary depending on the type of data you are filtering. See the [Dashboard filter controls](https://docs.cloud.google.com/looker/docs/filters-user-defined-dashboards.md.txt#dashboard_filter_controls) section on this page to learn more about the different types of controls.
- **Display** : For controls that can be displayed as either inline or popover, select how the filter will be displayed. See the [Displaying dashboard filters](https://docs.cloud.google.com/looker/docs/filters-user-defined-dashboards.md.txt#displaying_dashboard_filters) section on this page to learn more about the different ways to display filters. If a control can be displayed only in one way, this option won't appear.
- **Values** : To set specific value options for the filter, choose from the drop-down or enter the value options in this field. Leave blank to allow value options from the database to be surfaced, up to the maximum number of values available for that control. For numeric data, this field is replaced by the **Min** and **Max** fields.
- **Configure Default Value**: Optionally, set the default value for the filter.
- **Require a filter value** : Click **Additional options** to see the **Require a filter value** option. Click the checkbox to require a value for the filter. See the [Requiring a filter value](https://docs.cloud.google.com/looker/docs/filters-user-defined-dashboards.md.txt#requiring_a_filter_value) section on this page to learn more about requiring filter values.
- **Select filters to update when this filter changes** : Click **Additional options** to see the **Select filters to update when this filter changes** option. Click the checkbox to link other filters to this filter. See the [Setting up linked filters](https://docs.cloud.google.com/looker/docs/filters-user-defined-dashboards.md.txt#setting_up_linked_filters) section on this page to learn more about linked filters. If there are no other filters on the dashboard, this option will be disabled.
- **Add** and **Cancel**: Click one of these buttons to save or cancel the new filter.
The **Tiles To Update** tab lets you determine which tiles listen to the filter.
#### Default behavior of the **Tiles To Update** tab
> [!NOTE]
> **Note:** If your [dashboard has tabs](https://docs.cloud.google.com/looker/docs/tabbed-dashboards.md.txt#apply-filters), tiles will be listed under the tab name where they are located.
Looker defaults to automatically applying the filter to any tiles that were created from the same Explore as the filter and sets the value of **Field to Filter** to the same field as the field chosen for the filter.
If any new tiles are added to the dashboard after the filter is created, if they were created from the same Explore as the filter, the dashboard filter is automatically applied to that tile.
> [!NOTE]
> **Note:** If dashboard filters are applied to a [merged results tile](https://docs.cloud.google.com/looker/docs/merged-results.md.txt#saving_your_merged_results_to_a_dashboard) and the merge changes in any way --- for example, if someone reorders the merge queries or adds or removes queries --- all dashboard filters will be turned off for that tile. To reapply the filters, you must turn on the tile under the **Tiles To Update** tab of the **Add/Edit Dashboard Filters** window.
#### Making edits to the **Tiles To Update** tab
> [!NOTE]
> **Note:** If your [dashboard has tabs](https://docs.cloud.google.com/looker/docs/tabbed-dashboards.md.txt#apply-filters), tiles will be organized under the tab name where they are located.
If you want to adjust which tiles listen to which filter, or which fields are affected by filters, the following settings are available.
- Select **All** or **None** to turn the filter on or off for all tiles.
> [!TIP]
> **Tip:** Starting in Looker 26.8, you can use the **All** or **None** options to globally turn a filter on or off for tiles at the dashboard level or, more granularly, at the tab level. Any tiles on a tab that are from a different Explore will be excluded from the **All** or **None** option.
- In the **Field to Filter** section, for each tile, choose which field will be affected by the filter, or choose not to apply the filter to an individual tile. If a new filter's field is already used by a pre-existing filter, any tiles filtered by the pre-existing filter are unavailable to the new filter.
- Select **Add** or **Cancel** to save or cancel the new filter settings.
## Dashboard filter controls
Dashboard filter controls let you customize the appearance of filters for dashboard viewers. The filter control types available in the **Control** drop-down as you create a dashboard filter depend on the LookML data [`type`](https://docs.cloud.google.com/looker/docs/reference/param-dimension-filter-parameter-types.md.txt) assigned to the field you're filtering on.
> [!NOTE]
> **Note:** To see the data type for a field that you're filtering on, you must have the [`see_lookml`](https://docs.cloud.google.com/looker/docs/admin-panel-users-roles.md.txt#see_lookml) permission. You can see the field's LookML by selecting [**Go to LookML**](https://docs.cloud.google.com/looker/docs/creating-and-editing-explores.md.txt#features_for_developers) from the field's gear menu in the field picker.
S = Works with the [`string`](https://docs.cloud.google.com/looker/docs/reference/param-dimension-filter-parameter-types.md.txt#string) data type
N = Works with the [`number`](https://docs.cloud.google.com/looker/docs/reference/param-dimension-filter-parameter-types.md.txt#number) data type and numeric measures
T = Works with the [`tier`](https://docs.cloud.google.com/looker/docs/reference/param-dimension-filter-parameter-types.md.txt#tier) data type
ZC = Works with the [`zipcode`](https://docs.cloud.google.com/looker/docs/reference/param-dimension-filter-parameter-types.md.txt#zipcode) data type
YN = Works with the [`yesno`](https://docs.cloud.google.com/looker/docs/reference/param-dimension-filter-parameter-types.md.txt#yesno) data type
DI = Works with the [`distance`](https://docs.cloud.google.com/looker/docs/reference/param-dimension-filter-parameter-types.md.txt#distance) data type
DU = Works with the [`duration`](https://docs.cloud.google.com/looker/docs/reference/param-dimension-filter-parameter-types.md.txt#duration) data type
DT = Works with most [date and time](https://docs.cloud.google.com/looker/docs/reference/param-dimension-filter-parameter-types.md.txt#time) data types^[**\***](https://docs.cloud.google.com/looker/docs/filters-user-defined-dashboards.md.txt#date_time_note)^
L = Works with the [`location`](https://docs.cloud.google.com/looker/docs/reference/param-dimension-filter-parameter-types.md.txt#location) data type
P = Works with the [`parameter`](https://docs.cloud.google.com/looker/docs/reference/param-field-parameter.md.txt) parameter
| Control | Description | Appearance | Data Types |
|---|---|---|---|
| Multiple Selection ||||
| Button Group | This type of filter is useful for giving viewers a curated set of limited options. Up to 30 options can be curated in the [**Values** setting](https://docs.cloud.google.com/looker/docs/filters-user-defined-dashboards.md.txt#values). For `string`, `tier`, and `zipcode` data types, if the **Values** setting is left blank, the first 30 values from the database are shown.
A button is colored once it's selected. | 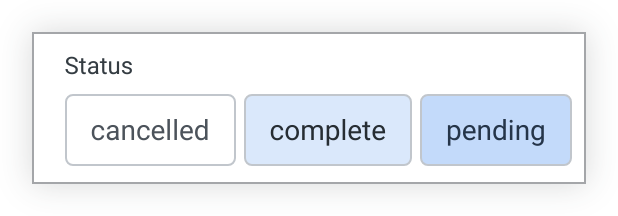 | S N T ZC YN DI DU |
| Checkboxes | Like a button group but with a slightly different design, this type of filter is useful for giving viewers a curated set of limited options. Up to 50 options can be curated in the [**Values** setting](https://docs.cloud.google.com/looker/docs/filters-user-defined-dashboards.md.txt#values). For `string`, `tier`, and `zipcode` data types, if the **Values** setting is left blank, the first 50 values from the database are shown. | 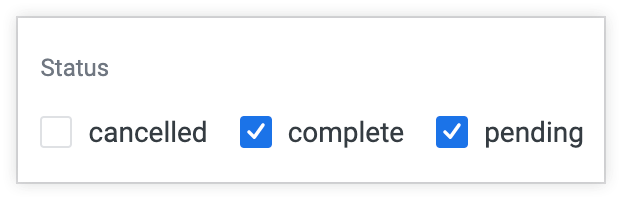 | S N T ZC YN DI DU |
| Tag List | A combination of drop-down and checkbox filters. The drop-down options can be curated in the [**Values** setting](https://docs.cloud.google.com/looker/docs/filters-user-defined-dashboards.md.txt#values). For `string`, `tier`, and `zipcode` data types, all values can be surfaced from the database if the **Values** setting is left blank.
Viewers can expand the values menu by either clicking into the filter field or by clicking the chevron. Users can select or deselect individual values by clicking a value's checkbox. Users can also click the **X** icon next to a filter value to deselect it. Users can select all available values by clicking the (Number selected) of (Number of options) checkbox (for example, 0 of 200 selected) to add all matching values to the filter, and can select **Deselect all** to remove all matching values. All changes will be automatically applied, unless the user clicks the **Cancel** button.
Tag list controls can appear only in the [popover orientation](https://docs.cloud.google.com/looker/docs/filters-user-defined-dashboards.md.txt#displaying_dashboard_filters) or behind the **More** button. The **Select all** option is not available if the dashboard URL length is over 2,083 characters. | 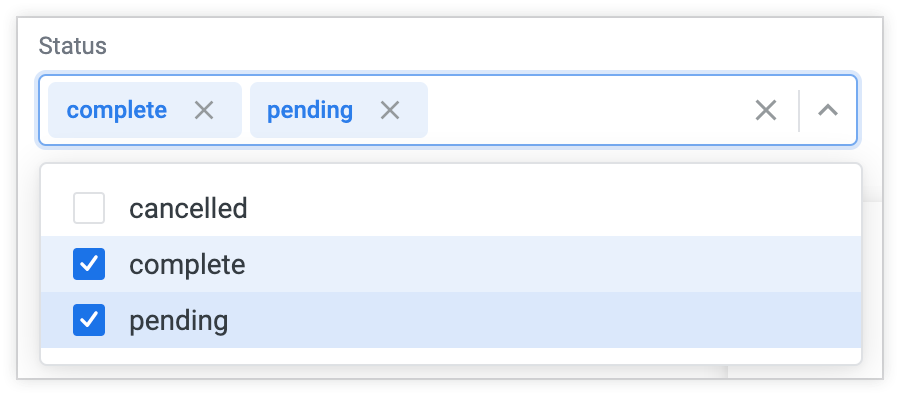 | S N T ZC DI DU |
| Range Slider | Range slider minimum and maximum can be set in the **Settings** tab of the filter configuration window.
Viewers can set the filter value range by adjusting both ends of the slider. | 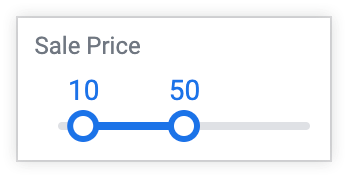 | N DI DU |
| Single Selection ||||
| Button Toggles | This type of filter is useful for giving viewers a curated set of limited options. Up to 30 options can be curated in the [**Values** setting](https://docs.cloud.google.com/looker/docs/filters-user-defined-dashboards.md.txt#values). For `string`, `tier`, and `zipcode` data types, if the **Values** setting is left blank, the first 30 values from the database are shown.
A button is colored once it's selected. | 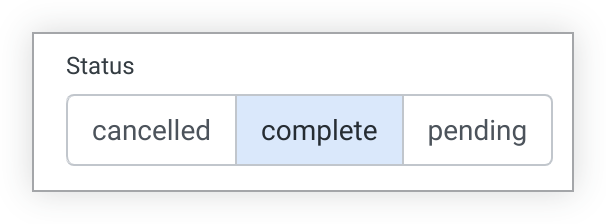 | S N T ZC YN DI DU P |
| Radio Buttons | Like a button toggle but with a slightly different design, this type of filter is useful for giving viewers a curated set of limited options. Up to 50 options can be curated in the [**Values** setting](https://docs.cloud.google.com/looker/docs/filters-user-defined-dashboards.md.txt#values). For `string`, `tier`, and `zipcode` data types, if the **Values** setting is left blank, the first 50 values from the database are shown. |  | S N T ZC YN DI DU P |
| Drop-down Menu | The drop-down options can be curated in the [**Values** setting](https://docs.cloud.google.com/looker/docs/filters-user-defined-dashboards.md.txt#values). For `string`, `tier`, and `zipcode` data types, all values can be surfaced from the database if the **Values** setting is left blank.
Viewers can expand the drop-down by either clicking into the filter field or clicking the chevron. Users can select an option from the drop-down or by typing in the box to narrow the drop-down options. Viewers can also select **Any value** .
Drop-down menu controls can appear only in the [inline orientation](https://docs.cloud.google.com/looker/docs/filters-user-defined-dashboards.md.txt#displaying_dashboard_filters) or behind the **More** button. | 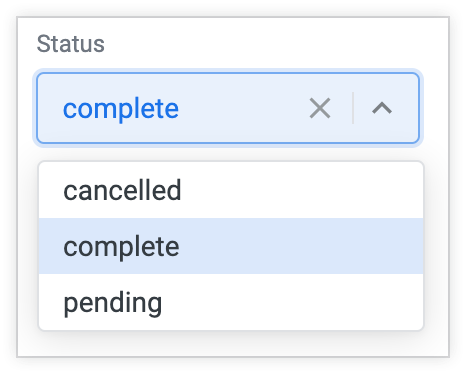 | S N T ZC YN DI DU P |
| Slider | Slider minimum and maximum can be set in the **Settings** tab of the filter configuration window.
Viewers can set the filter value by adjusting the right end of the slider. | 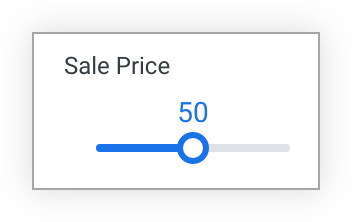 | N DI DU |
| Dates and Times ||||
| Single Day | Viewers can select the date to expand the calendar and select a new day.
Single day menu controls can appear only in the [inline orientation](https://docs.cloud.google.com/looker/docs/filters-user-defined-dashboards.md.txt#displaying_dashboard_filters) or behind the **More** button. | 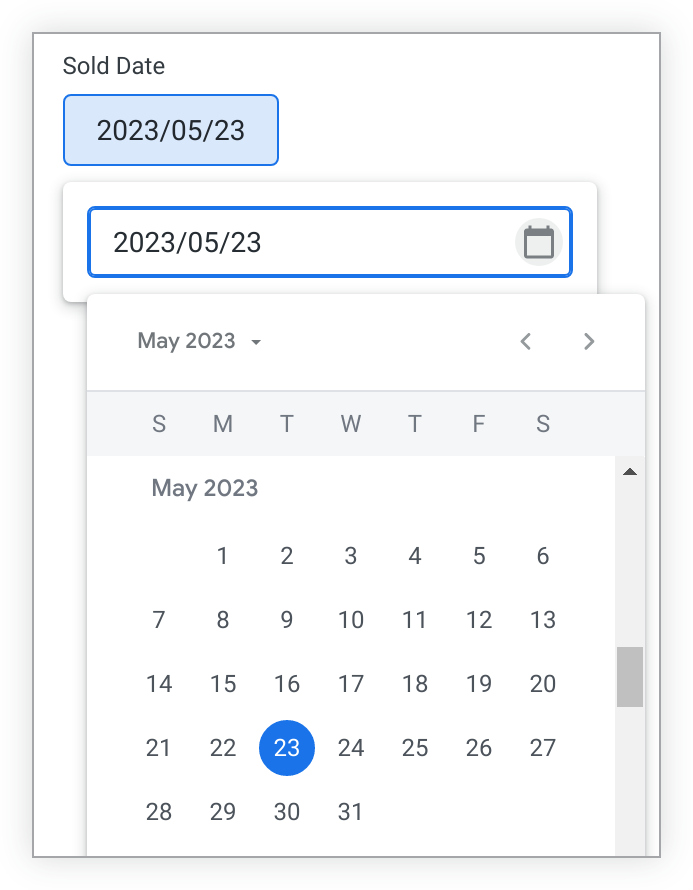 | DT^[**\***](https://docs.cloud.google.com/looker/docs/filters-user-defined-dashboards.md.txt#date_time_note)^The single day control can be used with most [timeframes](https://docs.cloud.google.com/looker/docs/reference/param-field-dimension-group.md.txt#timeframe_options)and [time-based types](https://docs.cloud.google.com/looker/docs/reference/param-dimension-filter-parameter-types.md.txt#available_time-based_types), but viewers can only select single dates with this typeof control. |
| Date Range | Viewers can select the date range to expand the calendar and select a new date range.
Date range menu controls can appear only in the [inline orientation](https://docs.cloud.google.com/looker/docs/filters-user-defined-dashboards.md.txt#displaying_dashboard_filters) or behind the **More** button. | 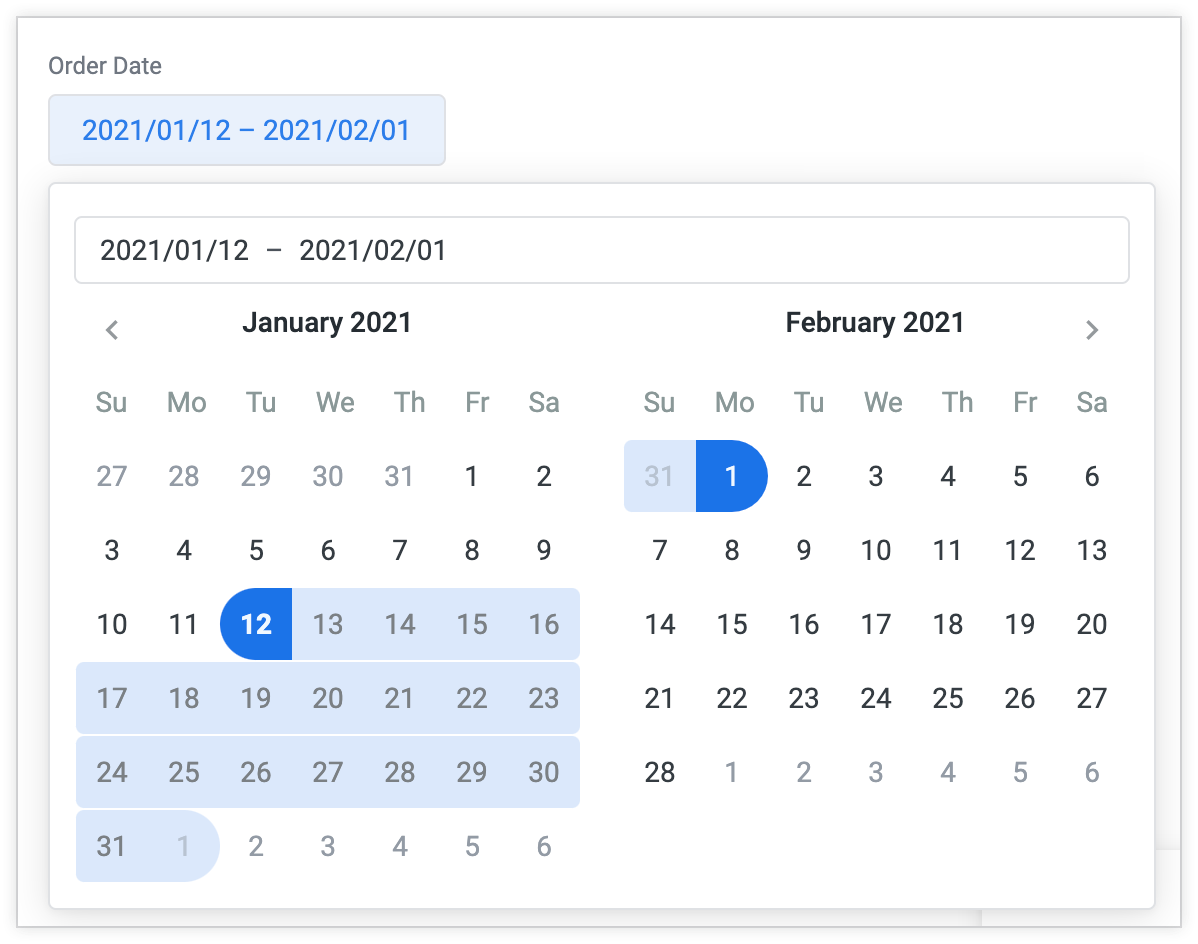 | DT^[**\***](https://docs.cloud.google.com/looker/docs/filters-user-defined-dashboards.md.txt#date_time_note)^ The date range control can be used with most [timeframes](https://docs.cloud.google.com/looker/docs/reference/param-field-dimension-group.md.txt#timeframe_options) and [time-based types](https://docs.cloud.google.com/looker/docs/reference/param-dimension-filter-parameter-types.md.txt#available_time-based_types), but viewers can only select date ranges with this type of control. |
| Timeframes | Viewers can either select from a set of timeframes built into Looker or create their own custom timeframes by selecting the **Custom** tab. See the [Viewing dashboards](https://docs.cloud.google.com/looker/docs/viewing-dashboards.md.txt#temporarily_changing_filter_values_on_dashboards) documentation page to see the full range of timeframes options for a Timeframes filter.
Timeframes options such as **Last 7 Days** include the current day. For a timeframe that [excludes the current day](https://docs.cloud.google.com/looker/docs/filters-user-defined-dashboards.md.txt#advanced_controls,_dates,_and_times), select **Advanced** from the control drop-down and configure the value using **complete days** .
**Year to Date** includes the beginning of the year through to the current second.
Viewers can select the timeframe to see the timeframes options.
Timeframes menu controls can appear only in the [inline orientation](https://docs.cloud.google.com/looker/docs/filters-user-defined-dashboards.md.txt#displaying_dashboard_filters) or behind the **More** button. | 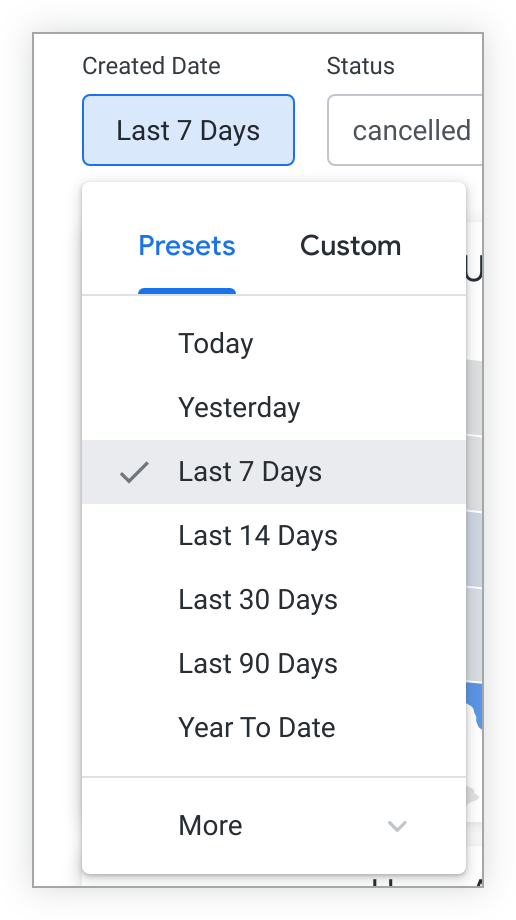 | DT^[**\***](https://docs.cloud.google.com/looker/docs/filters-user-defined-dashboards.md.txt#date_time_note)^ The timeframe control can be used with most [timeframes](https://docs.cloud.google.com/looker/docs/reference/param-field-dimension-group.md.txt#timeframe_options) and [time-based types](https://docs.cloud.google.com/looker/docs/reference/param-dimension-filter-parameter-types.md.txt#available_time-based_types), but viewers cannot select time options with this type of control. |
| Other ||||
| Advanced | See the [Using advanced controls](https://docs.cloud.google.com/looker/docs/filters-user-defined-dashboards.md.txt#using_advanced_controls) section on this page to learn more about advanced controls.
Advanced controls can appear only in the [popover orientation](https://docs.cloud.google.com/looker/docs/filters-user-defined-dashboards.md.txt#displaying_dashboard_filters) or behind the **More** button. | 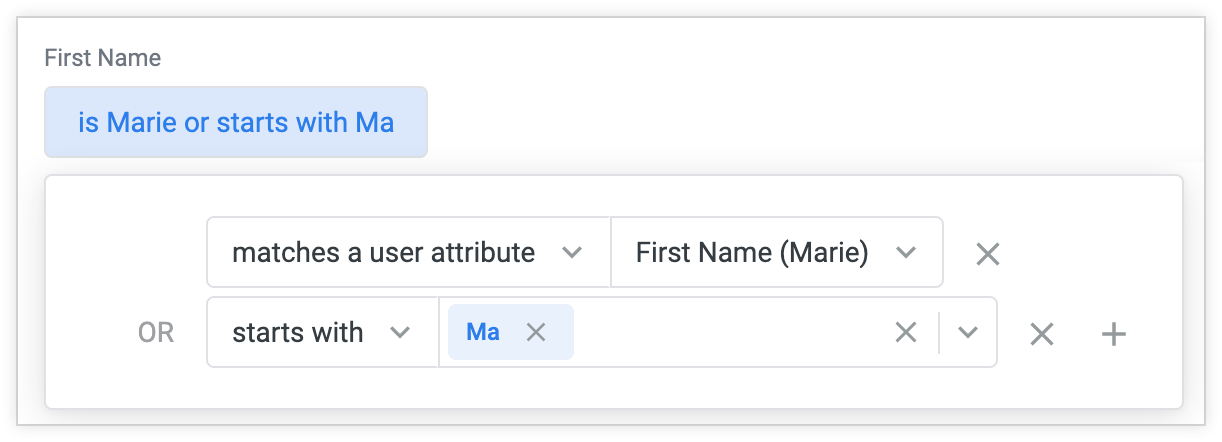 | S N T ZC YN DT DI DU L P |
| ^**\***^**Note about date and time data:** Some [timeframes](https://docs.cloud.google.com/looker/docs/reference/param-field-dimension-group.md.txt#timeframe_options) and [time-based types](https://docs.cloud.google.com/looker/docs/reference/param-dimension-filter-parameter-types.md.txt#available_time-based_types) are interpreted as different data types when Looker is selecting control options for them. Two examples are the [`yesno` timeframe](https://docs.cloud.google.com/looker/docs/reference/param-field-dimension-group.md.txt#yesno), which is interpreted as a [`yesno` data type](https://docs.cloud.google.com/looker/docs/reference/param-dimension-filter-parameter-types.md.txt#yesno) and therefore has the control options available to the `yesno` type; and the [`hour_of_day` timeframe](https://docs.cloud.google.com/looker/docs/reference/param-field-dimension-group.md.txt#hour_of_day), which is interpreted as a `number` data type and therefore has the control options available to the `number` type. ||||
### Using advanced controls
> [!NOTE]
> **Note:** Advanced controls are not the same as [advanced filters](https://docs.cloud.google.com/looker/docs/filters-user-defined-dashboards.md.txt#advanced_filters).
An advanced control can be applied to all types of data and provides some additional flexibility in the filter conditions you can set up. To create an advanced control, expand the **Control** drop-down in the [filter configuration window](https://docs.cloud.google.com/looker/docs/filters-user-defined-dashboards.md.txt#customizing_filter_configuration) and select **Advanced**.
Once you select **Advanced** , the **Configure filter options** section is populated with appropriate filter condition options for the type of data that you're filtering. For example, if you created a filter for a field with a [`string`](https://docs.cloud.google.com/looker/docs/reference/param-dimension-filter-parameter-types.md.txt#string) data type, the filter condition options, such as **is** , **contains** , and **starts with** , will appear. Filters on other types of data, such as `number` or `date` types, will display different condition options. You can set the condition options for the filter by clicking the box for each condition option.
The **Allow multiple filter values** option lets users select more than one value for the filter. It defaults to enabled. When enabled, a `+` **Add** symbol appears next to the **Configure Default Value** field. Select the `+` symbol to add an additional filter value. To restrict users so that they can select only one value, disable this option. The **Allow multiple filter values** option is not available for filters based on the [`location`](https://docs.cloud.google.com/looker/docs/reference/param-dimension-filter-parameter-types.md.txt#location) data type or based on the [`parameter`](https://docs.cloud.google.com/looker/docs/reference/param-field-parameter.md.txt) parameter.
Once you select your filter condition option, you can select a value from the **Configure Default Value** menu, which is populated with values from your database. Or, you can enter a value to receive a suggestion.
You can also enter a value yourself and press **Enter** for PC, or **Return** for Mac to create a value.
You can select the `+` next to your filter value to add new conditions to the filter, which will be added as either `OR` conditions or `AND` conditions, depending on the types of conditions and values.
To remove a condition, click the `X` next to that condition.
#### Advanced controls, dates, and times
While there are several filter controls that allow filtering on dates, you can also use advanced controls with dates. Among other things, using advanced controls lets users select "complete" ranges that don't include the current time period, by selecting ranges such as **complete days** or **complete weeks** in the condition options. This is unlike the timeframe filter control, which includes the current time period.
Advanced controls also let users select time values, such as hours, minutes, and seconds.
#### Matches a user attribute
Advanced controls also give you the option to select **matches a user attribute** in the **Configure filter options** section. This option lets you set filters that change dynamically based on dashboard viewers' [user attributes](https://docs.cloud.google.com/looker/docs/admin-panel-users-user-attributes.md.txt). See the [Filtering and limiting data](https://docs.cloud.google.com/looker/docs/filtering-and-limiting.md.txt#adapt_filters_to_each_user_with_user_attributes) documentation page for more information.
#### Matches advanced
If you click **matches advanced** in the **Configure filter options** section, you can enter a [Looker filter expression](https://docs.cloud.google.com/looker/docs/filter-expressions.md.txt) to customize a filter beyond the options that are provided in the options menu.
You can also reference user attributes in matches advanced filters by using the following syntax:
`{{ _user_attributes['name_of_your_attribute'] }}`
## Displaying dashboard filters
You have several options for altering the way dashboard filters are displayed. You can adjust the appearance of [individual filter controls](https://docs.cloud.google.com/looker/docs/filters-user-defined-dashboards.md.txt#appearance_of_individual_filters) or of the [entire filter bar](https://docs.cloud.google.com/looker/docs/filters-user-defined-dashboards.md.txt#appearance_of_the_filter_bar).
### Appearance of individual filters
To set the way a filter appears, first make sure your dashboard is in [edit mode](https://docs.cloud.google.com/looker/docs/editing-user-defined-dashboards.md.txt#entering_edit_mode_in_dashboards_(beta)) and then select the style of display in the **Display** field of the filter configuration window that appears when you select [**Edit**](https://docs.cloud.google.com/looker/docs/filters-user-defined-dashboards.md.txt#editing_dashboard_filters) from the filter menu. Most dashboard filters can be displayed in the following ways:
> [!IMPORTANT]
> **Important:** If you edit a [dashboard with tabs](https://docs.cloud.google.com/looker/docs/tabbed-dashboards.md.txt), every filter will appear on every tab in edit mode. Once you exit edit mode, a filter will only appear on a tab if it is applied to at least one tile on that tab.
- **Inline**: The filter is displayed directly in the top bar of the dashboard.
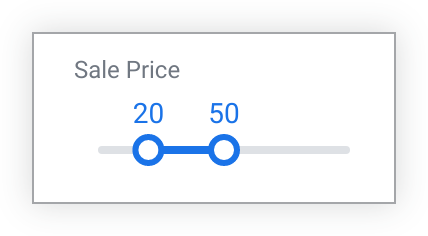
- **Popover**: A summary value appears in the top bar of the dashboard; select the value to see the full filter.
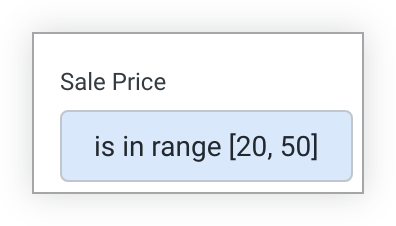
- Filters can also be [placed behind a **More** button](https://docs.cloud.google.com/looker/docs/filters-user-defined-dashboards.md.txt#moving_and_repositioning_dashboard_filters): A **More** button will appear in the filter bar with an indicator that shows the number of filters the bar contains; viewers can select the button to see the filters and their values.
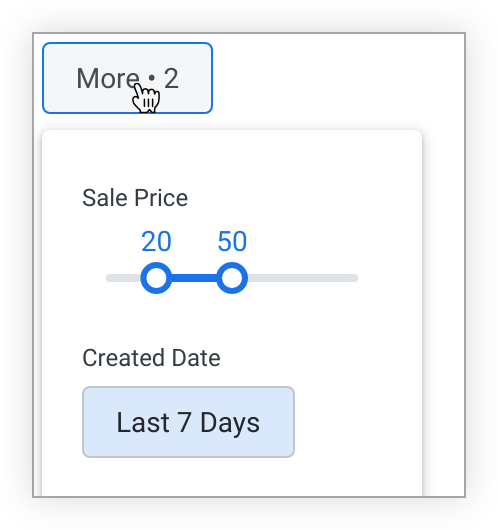
Some filter controls can be displayed only in inline orientation; when you edit a dashboard with these filter controls, you won't see a **Display** field in the filter configuration window. These filter controls can be displayed only in inline orientation:
- Drop-down Menu
- Single Day
- Timeframes
- Date Range
Additionally, some filter controls can be displayed only in popover orientation; when you edit a dashboard with these filter controls, you won't see a **Display** field in the filter configuration window. These filter controls can be displayed only in popover orientation:
- Tag List
- Advanced
Generally, we recommend that important or frequently used filters be displayed as inline or popover, and less frequently used filters be displayed as overflow.
### Appearance of the filter bar
To set the way a filter bar appears, follow these steps:
1. Make sure your dashboard is in [edit mode](https://docs.cloud.google.com/looker/docs/editing-user-defined-dashboards.md.txt#entering_edit_mode_in_dashboards_(beta)).
> [!IMPORTANT]
> **Important:** If you edit a [dashboard with tabs](https://docs.cloud.google.com/looker/docs/tabbed-dashboards.md.txt), every filter will appear on every tab in edit mode. Once you exit edit mode, a filter will only appear on a tab if it is applied to at least one tile on that tab.
1. Open the dashboard's [**Settings**](https://docs.cloud.google.com/looker/docs/editing-user-defined-dashboards.md.txt#editing_dashboard_settings) window.
2. Select the **Filters** tab of the **Settings** window.
3. You can set the [**Default filters view**](https://docs.cloud.google.com/looker/docs/editing-user-defined-dashboards.md.txt#default_filters_view) option to **Expanded** or **Collapsed** . (The default is **Expanded**.)
4. The [**Filters location**](https://docs.cloud.google.com/looker/docs/editing-user-defined-dashboards.md.txt#filters_location) option lets you place the filter bar at the top or the right of the dashboard. (The default is at the top.)
## Requiring a filter value
> [!IMPORTANT]
> **Important:** To limit dashboard viewers' data access, use the [`access_filter`](https://docs.cloud.google.com/looker/docs/reference/param-explore-access-filter.md.txt) LookML parameter instead of required filters.
By default, filters don't require values. If a filter that does not require a value is left blank, the data simply isn't restricted by the filter field. For example, if you have a filter on a **State** field on a dashboard and that filter was not given a value, the dashboard returns data for all states.
If a filter does require a value, the dashboard won't run until you select a filter value. A required filter with no value selected displays warnings next to the filter and when holding the pointer over the reload icon until a value is chosen.
Additionally, you cannot create a dashboard schedule without selecting a value for a required filter or clear cache and refresh a tile that is linked to a required filter that does not have a value.
To require that a user enter a value in a filter before they can run the dashboard:
1. Make sure the dashboard is in [edit mode](https://docs.cloud.google.com/looker/docs/editing-user-defined-dashboards.md.txt#entering_edit_mode_in_dashboards_(beta)).
> [!IMPORTANT]
> **Important:** If you edit a [dashboard with tabs](https://docs.cloud.google.com/looker/docs/tabbed-dashboards.md.txt), every filter will appear on every tab in edit mode. Once you exit edit mode, a filter will only appear on a tab if it is applied to at least one tile on that tab.
1. Open the filter configuration window for the filter, either by [adding](https://docs.cloud.google.com/looker/docs/filters-user-defined-dashboards.md.txt#adding_dashboard_(beta)_filters) a new dashboard filter, or by [editing](https://docs.cloud.google.com/looker/docs/filters-user-defined-dashboards.md.txt#editing_dashboard_(beta)_filters) an existing dashboard filter.
2. Select the arrow next to the **Additional options** heading to reveal the additional options.
3. Select the **Require a filter value** checkbox.
4. Select **Update** to save your change.
The **Require a filter value** checkbox simply requires that viewers select any value. To restrict the values a viewer is able to select, set the allowed values in the [**Values**](https://docs.cloud.google.com/looker/docs/filters-user-defined-dashboards.md.txt#values) field of the filter configuration window.
Required filters are helpful in limiting the sizes of queries sent to your database. To limit dashboard viewers' data access, use the [`access_filter`](https://docs.cloud.google.com/looker/docs/reference/param-explore-access-filter.md.txt) LookML parameter instead.
## Setting up linked filters
> [!NOTE]
> **Note:** Linked filters don't affect suggestions on any fields that have a [suggest_dimension](https://docs.cloud.google.com/looker/docs/reference/param-field-suggest-dimension.md.txt) provided.
Dashboard filters can be linked so that the filter value options for one filter are narrowed based on the filter value or values selected for a different filter on the same dashboard.
For example, you can link a dashboard filter for City to a separate filter for State. The filter value options for City will change based on the state or states selected in the State filter.
Once you select a filter value for State, a link icon appears with the City filter. If you hold the pointer over the link icon, a box appears that states that the value options for that filter have been narrowed by the State filter.
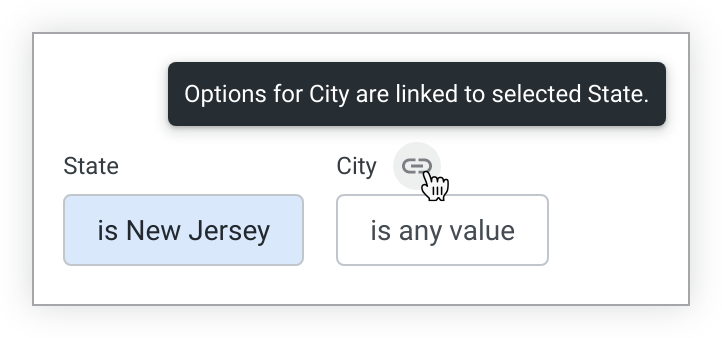
You can go further and link a Zip filter to the City and State filters, narrowing the value options for Zip depending on the city and state selected. For example, if the State filter is New Jersey and the City filter is Asbury Park, the Zip filter drop-down only displays the value for the zip code within Asbury Park.
If you link filters and your data contains no values for a "child" filter (the filter to be narrowed), given the values selected in the "parent" filter (the filter that narrows the child filter's options), viewers will see a **No matches found** message for the child filter.
Linked filters work in one direction, from parent to child. If you make a selection in a child filter, it won't affect the filter value options presented to you for the parent filter.
### How to link filters
When you are linking filters, any filter can be used as the "parent" filter (the filter that narrows another filter's options), but the "child" filter (the filter to be narrowed) can only use a field of type [`string`](https://docs.cloud.google.com/looker/docs/reference/param-dimension-filter-parameter-types.md.txt#string), commonly used for words or phrases, or type [`zipcode`](https://docs.cloud.google.com/looker/docs/reference/param-dimension-filter-parameter-types.md.txt#zipcode), commonly used for zip codes.
If there is only one filter on the dashboard, the ability to link filters is disabled.
To link one filter to another:
1. Make sure the dashboard is in [edit mode](https://docs.cloud.google.com/looker/docs/editing-user-defined-dashboards.md.txt#entering_edit_mode_in_dashboards_(beta)).
> [!IMPORTANT]
> **Important:** If you edit a [dashboard with tabs](https://docs.cloud.google.com/looker/docs/tabbed-dashboards.md.txt), every filter will appear on every tab in edit mode. Once you exit edit mode, a filter will only appear on a tab if it is applied to at least one tile on that tab.
1. Open the filter configuration window for the "parent" filter, either by [adding](https://docs.cloud.google.com/looker/docs/filters-user-defined-dashboards.md.txt#adding_dashboard_(beta)_filters) a new dashboard filter, or by [editing](https://docs.cloud.google.com/looker/docs/filters-user-defined-dashboards.md.txt#editing_dashboard_(beta)_filters) an existing dashboard filter.
2. Select the arrow next to of the **Additional options** heading to reveal the additional options.
3. Select the **Select filters to update when this filter changes** checkbox.
4. Select the field box to reveal a drop-down with the other `string` and `zipcode` filters present on the dashboard.
5. Select the `string` or `zipcode` filter or filters you would like to link to this filter.
6. Select **Update** to save your change.
## Moving and repositioning dashboard filters
Once filters are placed on a dashboard, you can move or reposition them by:
1. Entering [edit mode](https://docs.cloud.google.com/looker/docs/editing-user-defined-dashboards.md.txt#entering_edit_mode_in_dashboards_(beta)) on the dashboard.
> [!IMPORTANT]
> **Important:** If you edit a [dashboard with tabs](https://docs.cloud.google.com/looker/docs/tabbed-dashboards.md.txt), every filter will appear on every tab in edit mode. Once you exit edit mode, a filter will only appear on a tab if it is applied to at least one tile on that tab.
1. Hovering over the filter to display the filter's six-dot icon. The six-dot icon appears at the top left of the filter. 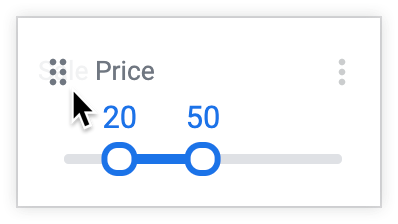
2. Selecting and holding the six-dot icon, and dragging the filter to the position you want.
This drag method can be used to reposition [inline and popover filters](https://docs.cloud.google.com/looker/docs/filters-user-defined-dashboards.md.txt#appearance_of_individual_filters), reconfigure which filters are placed [behind a **More** button](https://docs.cloud.google.com/looker/docs/filters-user-defined-dashboards.md.txt#appearance_of_individual_filters), and reposition filters within the **More** button drop-down.
If no filters are behind the **More** button, an empty **More** button temporarily appears while you are dragging a filter. You can move the filter over the **More** button to move it into the **More** button. If you don't place the filter in the **More** button, it disappears once you stop holding the filter.
If [cross-filtering](https://docs.cloud.google.com/looker/docs/cross-filtering-dashboards.md.txt) is enabled on a dashboard, you cannot drag to reposition cross-filters, and entering edit mode clears any cross-filters set on the dashboard.
## Filters as tiles
The **Filters as tiles** feature lets you place dashboard filters directly onto the dashboard canvas as tiles, rather than restricting them to the filter bar at the top of the dashboard. This feature lets dashboard creators place filter controls next to the specific visualization tiles that they affect.
Additionally, **Filters as tiles** allows users to view the list of filters that are applied to a specific visualization tile.
### Placing filters as dashboard tiles
Dashboard editors can convert filters into draggable tiles on the dashboard canvas in the following ways:
- To send a filter from the filter bar to the dashboard canvas:
- Drag the filter to the **Drag filters here to add to dashboard** space in the filter bar.
- Alternatively, select the three-dot **Filter Menu** icon next to the filter, and select **Send to dashboard**.
- To send a filter from the dashboard canvas back to the filter bar:
- Select the three-dot **Filter Menu** icon on the filter tile, and select **Send to filter bar**.
An editor can drag and arrange filter tiles on the dashboard canvas in the same way as other dashboard tiles. A filter can reside in the top filter bar or on the dashboard canvas, and its position does not affect which tiles it applies to.
A filter can only appear once on the dashboard, either in the top filter bar or on the canvas. If you duplicate a filter tile on a dashboard canvas, a new filter with a different filter ID is created.
#### When duplicating a dashboard tab
If a tab includes a filter that's placed as a tile, duplicating that tab also duplicates the filter tile on the new tab. The duplicated tile remains the same filter instance, sharing the same filter ID as the original, so changing a value in one updates it in the other.
#### Disabling the **Filters as tiles and tile-level filter context** preview toggle
If you disable the preview toggle, the following changes occur:
- Any filters that were previously added to the dashboard canvas as tiles will show up in the filter bar at the top of the dashboard.
- The filter tiles on the dashboard canvas will be displayed as blank tiles.
- In edit mode, a note will be displayed on the blank dashboard tiles to indicate that they were filter tiles.
### Showing applied filters for a visualization tile
When the [**Filters as tiles and tile-level filter context**](https://docs.cloud.google.com/looker/docs/admin-panel-general-preview-features.md.txt#filters-as-tiles-and-tile-level-filter-context) or [**Filters on Visualization Tiles**](https://docs.cloud.google.com/looker/docs/admin-panel-general-preview-features.md.txt#filters-on-visualization-tiles) preview feature is enabled, viewers can check which filters are applied to a specific visualization tile.
To view applied filters on a visualization tile, do either of the following:
- Select the **Show filters** filter icon in the top-right header of the visualization tile.
- Hold your pointer over the visualization tile, select the three-dot **Tile actions** icon, and then select **Show Filters**.
A side menu displays all applied filters and their selected values, organized into the following categories:
- **Vis Filters** : Displays the filters that are applied directly to the visualization tile (if the **Filters on Visualization Tiles** preview feature is enabled).
- **Dashboard Filters** : Displays dashboard-level filters that apply to the tile. This includes [cross-filters](https://docs.cloud.google.com/looker/docs/cross-filtering-dashboards.md.txt).
- **Query Filters**: Displays the filters that are configured in the tile's underlying query (in the Explore or Look).
If no relevant filters apply to the tile, the menu displays **No Filters**.
Dashboard creators and editors can configure whether and which filters are displayed on visualization tiles by using the [**Tile filter information** setting](https://docs.cloud.google.com/looker/docs/editing-user-defined-dashboards.md.txt#display-applied-filters-on-tiles) on the **Filters** tab of the dashboard **Settings** window:
- **Show all** : Displays dashboard-level filters, query-level filters (configured in the underlying Explore), and visualization-level filters (if the **Filters on Visualization Tiles** preview feature is enabled).
- **Hide query filters** (default): Displays dashboard-level filters and visualization-level filters (if the **Filters on Visualization Tiles** preview feature is enabled) only.
- **Do not show** : Prevents the **Show Filters** option and icon from appearing on visualization tiles.
When query-level filters are shown, they behave as follows:
- They appear with an info icon next to them to distinguish them from dashboard-level filters.
- If complex logic (such as `AND`/`OR` logic) has been implemented in the underlying Explore's queries, the filter context is summarized under a **custom filter** label.
### Filters as tiles in LookML dashboards
Filters as tiles are supported by LookML dashboards. Filter elements can be configured under the `elements` section of the LookML dashboard code to place them as tiles on the dashboard canvas. In addition, a filter context configuration parameter controls the display of applied filters on visualization tiles. If this parameter is omitted, the default behavior is to hide query filters.
## Filters on visualization tiles
> [!WARNING]
>
> **Preview**
>
>
> This product or feature is
>
> subject to the "Pre-GA Offerings Terms" in the General Service Terms section
> of the [Service Specific
> Terms](https://docs.cloud.google.com/terms/service-terms#1).
>
> Pre-GA products and features are available "as is" and might have limited support.
>
> For more information, see the
> [launch stage descriptions](https://cloud.google.com/products/#product-launch-stages).
> [!NOTE]
> **Note:** Use the [Looker Filters on Visualization Tiles - Preview Issues form](https://forms.gle/zbWsUkk4AVwuqXu18) to provide feedback or report issues with this preview feature.
The **Filters on visualization tiles** feature lets dashboard creators place and manage filters directly on individual visualization tiles rather than only in the filter bar at the top of the dashboard. This feature provides contextual, localized filtering controls that apply exclusively to the specific tile where they are configured.
To use this feature, a Looker admin must enable the **[Filters on Visualization Tiles](https://docs.cloud.google.com/looker/docs/admin-panel-general-preview-features.md.txt#filters-on-visualization-tiles)** toggle on the **Preview Features** page in the **Admin** panel.
### Adding a filter to a visualization tile
To add filters to a visualization tile, you must have dashboard edit privileges.
To add a filter directly to an individual visualization tile, do the following:
1. Make sure that the dashboard is in [edit mode](https://docs.cloud.google.com/looker/docs/editing-user-defined-dashboards.md.txt#entering_edit_mode_in_dashboards).
2. On the visualization tile where you want to add a filter, select the **Add vis filter** icon in the tile header.
3. In the dialog that appears, select the **Add filter** option.
4. An **Add Filter** window appears, pre-populated with fields from the Explore that was used to create the tile. Select the field that you want to filter by.
5. Configure the filter settings, such as the filter title, control type, and default value.
6. Select **Add**.
7. When you're done editing the dashboard, select **Save** in the edit dashboard toolbar to save your changes and exit edit mode.
The filter control appears in a filter bar directly at the top of the visualization tile. The tile filter bar appears only when filters are configured on that tile.
### Interacting with and organizing visualization-level filters
Dashboard viewers and editors can interact with visualization-level filters directly on the tile:
- **Temporarily updating filter values**: Viewers can change filter values directly from the tile filter bar without obstructing the underlying visualization.
- **Reordering filters** : When the dashboard is in edit mode, editors can click and hold the **Hold and drag to reorder** icon in the tile filter bar to change their display order.
- **Horizontal scrolling**: Visualization-level filters are positioned at the top of the tile and don't wrap to multiple lines. If the number of filters exceeds the width of the tile, a horizontal scroll bar appears on the tile filter bar.
### Editing or deleting visualization-level filters
You must have dashboard edit privileges to edit or delete filters on a visualization tile. To edit or delete a filter on a visualization tile, do the following:
1. Make sure that the dashboard is in [edit mode](https://docs.cloud.google.com/looker/docs/editing-user-defined-dashboards.md.txt#entering_edit_mode_in_dashboards).
2. Click the three-dot **Filter Menu** icon next to the filter.
3. To edit the filter, select **Edit** . Update the filter configuration in the filter configuration window, and then select **Update**.
4. To delete the filter, select **Delete**.
5. When you're done editing the dashboard, select **Save** in the edit dashboard toolbar to save your changes and exit edit mode.
### Considerations and limitations
Keep the following considerations and limitations in mind when using filters on visualization tiles:
- **Tile-specific scope**: A visualization-level filter applies only to the specific tile where it's placed. It doesn't affect other tiles on the dashboard.
- **One filter per field per tile**: You can add only one visualization-level filter per field on each tile. If you attempt to add another filter for a field that already has a filter on that tile, Looker displays an error.
- **Distinct from dashboard-level filters**: Visualization-level filters cannot be moved to become dashboard-level filters, and dashboard-level filters cannot be moved directly onto a tile.
- **Explore from here** : If a user selects **Explore from here** from the tile's three-dot **Tile actions** menu, visualization-level filters aren't carried over into the Explore (consistent with dashboard-level filters).
- **Exporting and downloading**: When you download or print a dashboard as a PDF or an image, visualization-level filters are captured in a format that's based on the visible frame. If a tile filter bar contains overflowing filters that require scrolling, only the filters visible on the screen are included in the export; overflowing filters are cut off.
- **Dashboard URLs** : Active visualization-level filter values are captured in the dashboard URL (for example, with parameter syntax such as `vis_id.=`), allowing users to share specific filtered views of a dashboard.
- **LookML dashboards** : In LookML dashboards, visualization-level filters are specified by using the `vis_filter: true` subparameter under the [`filters:` parameter](https://docs.cloud.google.com/looker/docs/reference/param-lookml-dashboard.md.txt#filters). For standard dashboard-level filters, setting `vis_filter: false` is unnecessary.
## Hiding dashboard filters
> [!NOTE]
> **Note:** For [dashboards with tabs](https://docs.cloud.google.com/looker/docs/tabbed-dashboards.md.txt#apply-filters), if a filter is not applied to *any* tile on a specific tab, then the filter will be hidden for that tab.
You can hide dashboard filters by altering a dashboard's URL to include a `hide_filter` parameter for each filter that you want to hide. Any time users access the dashboard with that URL, they will see a version of the dashboard with those filters hidden. However, if users navigate to the dashboard in other ways, or access the dashboard with a URL that does not contain the `hide_filter` parameter, filters won't be hidden.
> [!CAUTION]
> **Caution:** Hiding dashboard filters through the dashboard URL is not a security feature. Users can still see and modify dashboard filters if they access the dashboard by navigating to it within Looker or by using a URL that does not contain the `hide_filter` parameter.
For example, following is the URL for a dashboard with two filters that aren't hidden: **User State** , which has a filter value set to New Jersey, and **Date**, which doesn't have a set filter value.
https://mycompany.looker.com/dashboards/390?User+State=New+Jersey&Date=
To hide a filter, you add a `hide_filter` parameter to the URL, preceded by an ampersand (`&`) and followed by an equal sign (`=`), and give the parameter the value of the filter name, with any spaces in the name replaced with plus symbols (`+`). You don't need to include the filter value (if any) in the `hide_filter` parameter.
To hide only the **User State** filter, alter the URL to the following:
https://mycompany.looker.com/dashboards/390?User+State=New+Jersey&Date=&hide_filter=User+State
To hide both the **User State** and the **Date** filters, add another `hide_filter` parameter for the **Date** filter:
https://mycompany.looker.com/dashboards/390?User+State=New+Jersey&Date=&hide_filter=User+State&hide_filter=Date
For filter names with special characters, such as the parentheses and forward slash in **First Purchase (Yes / No)**, the URL encodes the special characters:
https://mycompany.looker.com/dashboards/390?First+Purchase+%28Yes+%2F+No%29=
To hide that filter, you can copy the encoded filter name that already exists in the URL (`First+Purchase+%28Yes+%2F+No%29`) and use it as the value of the `hide_filter` parameter.
There are a few additional things to understand about hiding dashboard filters:
- Any user with [**View** access](https://docs.cloud.google.com/looker/docs/organizing-spaces.md.txt#folder_access_levels) to a dashboard can hide dashboard filters with the URL. The user does not need to have edit access to the dashboard.
- Hidden dashboard filters still apply to dashboard results, even though the filter controls are not visible on the dashboard.
- The values of the hidden filters can still be changed and applied to the dashboard by changing the values in the URL.
- Hidden filters can be revealed by removing the `hide_filter` parameters from the URL.
- You won't see hidden filters in edit mode.
- Hiding a [required filter](https://docs.cloud.google.com/looker/docs/filters-user-defined-dashboards.md.txt#requiring_a_filter_value) without a value causes the dashboard tiles to produce **Invalid filters** errors. To address one of these errors, assign a value to the required filter.
- If dashboards are being [scheduled or sent](https://docs.cloud.google.com/looker/docs/scheduling-and-sending-dashboards.md.txt), dashboard links that are included in the delivery don't include the `hide_filter` parameter.
- If dashboards contain [alerts](https://docs.cloud.google.com/looker/docs/alerts-overview.md.txt), dashboard links that are included in the alert delivery don't include the `hide_filter` parameter.
## Applying dashboard filters to alerts
The **Filters** menu also lets you apply filter edits to the alerts present on a dashboard's tiles. See the [**Effect of dashboard edits on alerts**](https://docs.cloud.google.com/looker/docs/effect-of-dashboard-edits-on-alerts.md.txt#editing_dashboard_filters) documentation page for more information.
## Editing dashboard filters
In [edit mode](https://docs.cloud.google.com/looker/docs/editing-user-defined-dashboards.md.txt#entering_edit_mode_in_dashboards_(beta)), a three-dot **Filter Menu** icon appears next to every filter. To edit a filter, select the icon. This opens the filter menu, which displays options to edit or delete a filter.
> [!IMPORTANT]
> **Important:** If you edit a [dashboard with tabs](https://docs.cloud.google.com/looker/docs/tabbed-dashboards.md.txt), every filter will appear on every tab in edit mode. Once you exit edit mode, a filter will only appear on a tab if it is applied to at least one tile on that tab.
> [!NOTE]
> **Note:** To edit or delete a filter that's located directly on an individual visualization tile, see [Editing or deleting visualization-level filters](https://docs.cloud.google.com/looker/docs/filters-user-defined-dashboards.md.txt#editing-or-deleting-visualization-level-filters).
Select the **Edit** menu option to open a filter configuration window, similar to the one used to [add a filter](https://docs.cloud.google.com/looker/docs/filters-user-defined-dashboards.md.txt#adding_dashboard_(beta)_filters), populated with the existing configuration for the filter. From there, you can update the filter-by field, the filter's settings, or the tiles to update. Select **Update** or **Cancel** in the filter configuration window to save or cancel your changes.
Once you've edited filters, select the dashboard's [**Update** button](https://docs.cloud.google.com/looker/docs/viewing-dashboards.md.txt#reload_data_icon) to apply the new filter settings to the tiles.
Select **Save** in the edit dashboard toolbar to save your changes and exit edit mode.
## Deleting dashboard filters
In [edit mode](https://docs.cloud.google.com/looker/docs/editing-user-defined-dashboards.md.txt#entering_edit_mode_in_dashboards_(beta)), three-dot **Filter Menu** icon appears next to every filter.
> [!IMPORTANT]
> **Important:** If you edit a [dashboard with tabs](https://docs.cloud.google.com/looker/docs/tabbed-dashboards.md.txt), every filter will appear on every tab in edit mode. Once you exit edit mode, a filter will only appear on a tab if it is applied to at least one tile on that tab.
> [!NOTE]
> **Note:** To edit or delete a filter that's located directly on an individual visualization tile, see [Editing or deleting visualization-level filters](https://docs.cloud.google.com/looker/docs/filters-user-defined-dashboards.md.txt#editing-or-deleting-visualization-level-filters).
To delete a filter:
1. Select the three-dot **Filter Menu** icon.
2. The filter menu opens. This menu displays options to edit or delete a filter.
3. Select the **Delete** menu option to delete the filter.
4. Select **Save** in the blue toolbar to save your changes and exit edit mode.
5. Once you've deleted the filters, select the dashboard's [**Update** button](https://docs.cloud.google.com/looker/docs/viewing-dashboards.md.txt#reload_data_icon) to apply the new filter settings to the tiles.
Alternatively, you can select the **Edit** menu option, which opens the filter configuration window. Select the **Delete** button within the filter configuration window to delete your filter.
Deleting a filter cannot be undone.