> [!NOTE]
> **Note:** The **Users** page functions slightly differently in [Looker (Google Cloud core)](https://docs.cloud.google.com/looker/docs/looker-core-overview.md.txt). See the [Looker (Google Cloud core) documentation](https://docs.cloud.google.com/looker/docs/looker-core-user-management.md.txt#the_users_page) for details on using the **Users** page with Looker (Google Cloud core).
The **Users** page in the **Users** section of the **Admin** panel lists all user accounts on your Looker instance.
> [!NOTE]
> **Note:** If you have a permission that provides access to only select pages in the Admin panel, such as [`manage_schedules`](https://docs.cloud.google.com/looker/docs/admin-panel-users-roles.md.txt#manage_schedules), [`manage_themes`](https://docs.cloud.google.com/looker/docs/admin-panel-users-roles.md.txt#manage_themes), or [`see_admin`](https://docs.cloud.google.com/looker/docs/admin-panel-users-roles.md.txt#see_admin), but you don't have the [Admin role](https://docs.cloud.google.com/looker/docs/admin-panel-users-roles.md.txt#default_roles), the page or pages that are described here may not be visible to you in the Admin panel.
## Viewing and searching users
The **Users** page shows the following information:
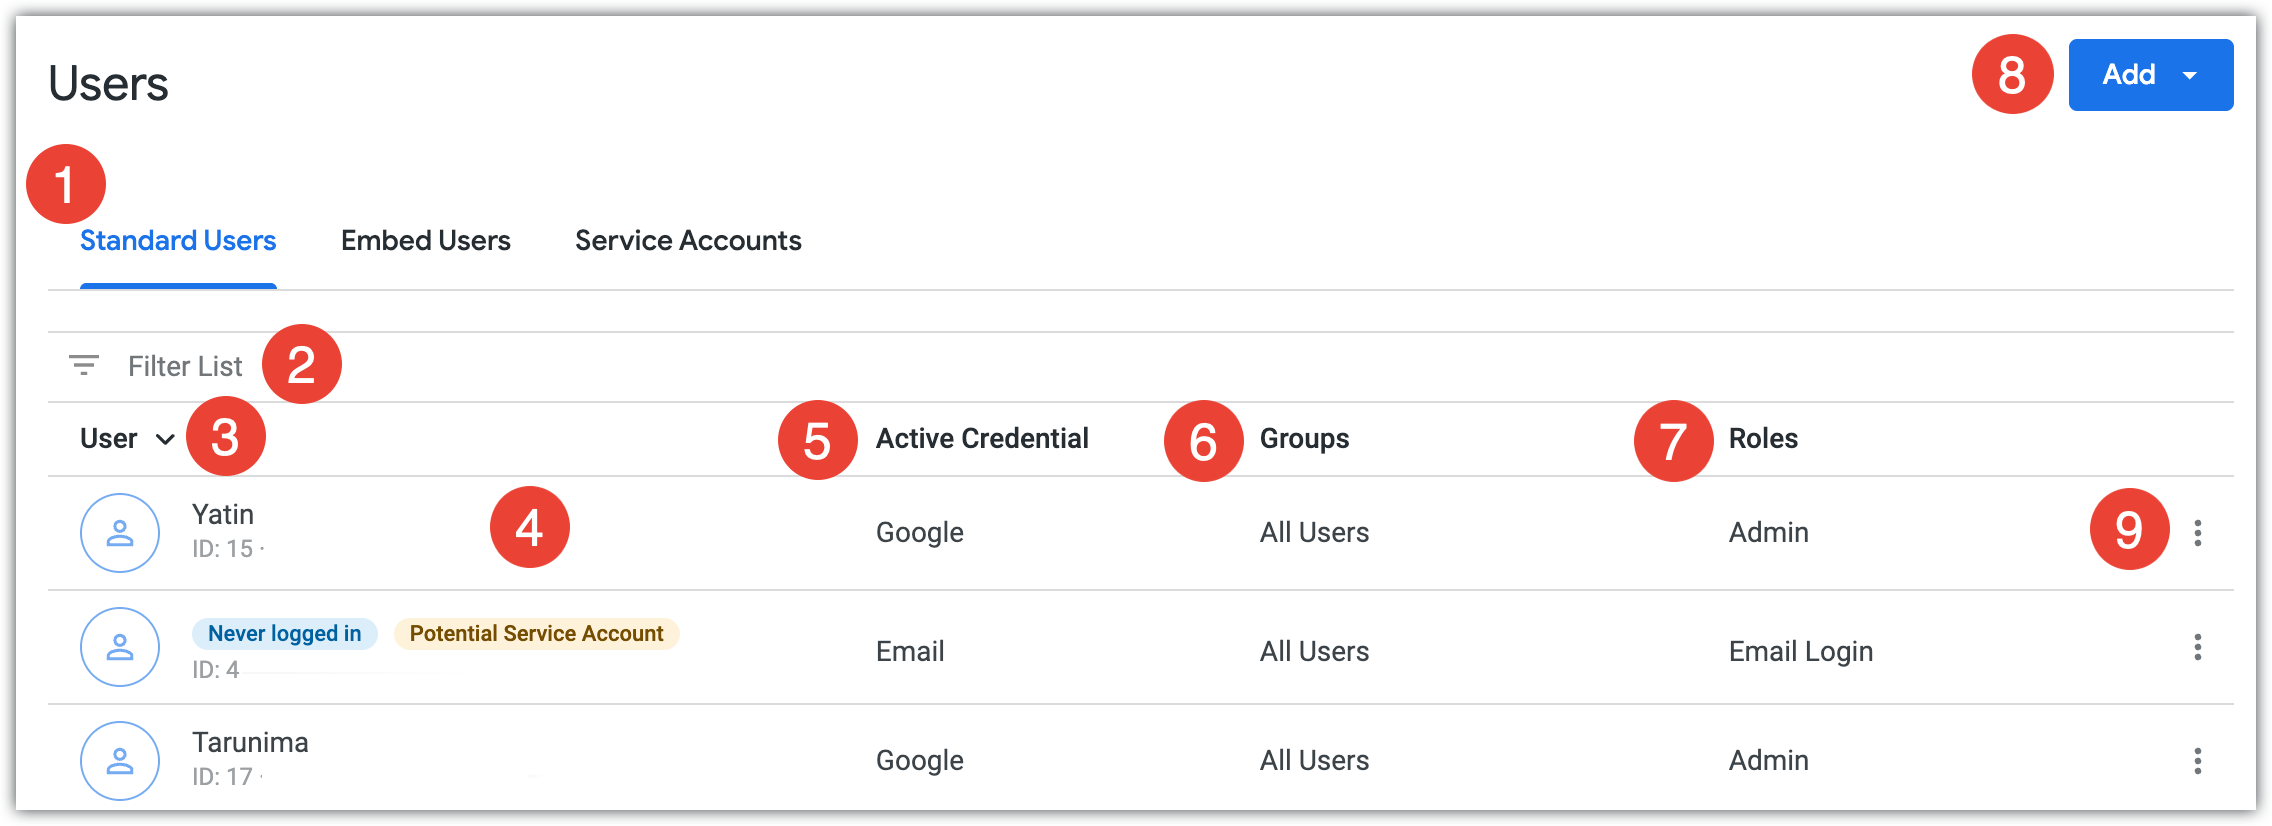
1. Tabs group your users by type:
- The **Standard Users** tab shows users who sign in to Looker directly, through either the regular authentication process or through the Looker API.
- The **Embed Users** tab shows [signed embed](https://docs.cloud.google.com/looker/docs/single-sign-on-embedding) users who are authenticated through a third-party application.
- The **Service Accounts** tab shows [API-only service accounts](https://docs.cloud.google.com/looker/docs/looker-core-user-management.md.txt#creating_an_api-only_service_account) that are authenticated through the Looker API using API keys.
- The **Looker Support** tab shows Looker Support analysts who were granted access to your Looker instance.
2. The **Filter List** field limits which users are shown. You can filter on user ID, name, or email address. To filter on user ID, enter a user ID to display that user. For name and email address, when you enter any string, the list of users displayed shows all users whose name or email address contains the string entered in the filter field. The **Filter List** replaces the search function on the previous version of the **Users** page.
3. Clicking the **User** column heading sorts the table by username in ascending or descending order.
4. Each row lists the user's name, ID, and email address, and it includes an icon that indicates the type of access the user has. Hold your cursor over the icon to see what the icon represents.
Click the row to edit the user. Users who cannot be edited are indicated by a lock on the user icon. These users are either system created (such as members of the All Users group) or externally managed by the [LDAP](https://docs.cloud.google.com/looker/docs/admin-panel-authentication-ldap.md.txt#groups_and_roles), [SAML](https://docs.cloud.google.com/looker/docs/admin-panel-authentication-saml.md.txt#groups_and_roles), or [OpenID Connect](https://docs.cloud.google.com/looker/docs/admin-panel-authentication-openid-connect.md.txt#groups_and_roles) protocol.
5. The **Active Credential** column lists the types of access that the user has to your Looker instance. This column appears only on the **Standard Users** tab.
6. The **Groups** column lists all [groups](https://docs.cloud.google.com/looker/docs/admin-panel-users-groups.md.txt) to which the user belongs.
7. The **Roles** column lists all [roles](https://docs.cloud.google.com/looker/docs/admin-panel-users-roles.md.txt) that are assigned to the user.
8. You click the **Add** button to create new [users](https://docs.cloud.google.com/looker/docs/admin-panel-users-users.md.txt#adding-users) and [service accounts](https://docs.cloud.google.com/looker/docs/admin-panel-users-users.md.txt#service-account).
9. You click the three-dot **Options** menu to [disable the user](https://docs.cloud.google.com/looker/docs/admin-panel-users-users.md.txt#disabling_users), [sudo as the user](https://docs.cloud.google.com/looker/docs/admin-panel-users-users.md.txt#impersonating_users), or [delete the user](https://docs.cloud.google.com/looker/docs/admin-panel-users-users.md.txt#deleting-users).
## Adding standard users
To add a standard user, complete the following steps:
1. Click the **Add** button to reveal a drop-down menu.
2. Click the **Users** menu item to open the **Add new users** page.
3. In the **Add a new user** page, type or paste a comma-separated list of email addresses in the **Email Addresses** field.
4. In the **Groups** field, select the groups that will be assigned to the users. To view the list of groups, start typing into the **Groups** field; all group names that include that text appear.
5. In the **Roles** field, select the roles that will be assigned to the users.
6. Click the **Save** button to create the users and, if you've selected the **Send setup emails** checkbox, to send sign-up emails.
> [!NOTE]
> **Note:** When an administrator creates an account to use the Platform on a user's behalf, additional information about the user's use is created, which may collect and use the following information:
>
>
>
> - License credentials to ensure that usage is in compliance with the customer's licensing terms. This information includes metadata about users, roles, database connections, server settings, features used, API usage, and Platform version. Information contained in your organization's Looker database used with the Platform, to which Looker have access when we automatically back it up and encrypt it for you.
> - Device information, which may include the hardware model, operating system and version, unique device identifiers, network information, IP address, and/or Platform version.
> - Logins that use external directory or single sign-on services share with us certain information to authenticate your identity and pre-populate certain forms (for example, user registration) on the Platform. Note that even if a user subsequently stops using the services, we will retain the information they have shared with us.
## Creating an API-only service account
You can create [API-only accounts (often called *service accounts*)](https://docs.cloud.google.com/looker/docs/api-auth.md.txt#managing_api_credentials) from the **Users** page within a Looker instance. These accounts can be granted the Admin Looker role and Looker API credentials. However, these accounts can't log in to Looker through the UI.
It is best practice to create dedicated service accounts for API scripts --- one service account for each script. That way, you can configure a service account with the specific set of permissions that allows the script to perform its function and *only* its function. For example, for an API script that runs queries, you can create a service account with the `access_data` permission, but no other permissions.
Dedicated service accounts for API scripts let you increase security by compartmentalizing a script's access. Also, if you ever need to stop a script, you can [disable](https://docs.cloud.google.com/looker/docs/admin-panel-users-users.md.txt#disabling_users) (or [delete](https://docs.cloud.google.com/looker/docs/admin-panel-users-users.md.txt#deleting-users)) that script's service account. Be sure to read the [Removing user access](https://docs.cloud.google.com/looker/docs/admin-panel-users-users.md.txt#removing_user_access) section on this page before you delete any user account.
Service accounts use licenses according to the roles that they have. If a service account is granted multiple roles, it consumes one license from the highest tier available among those roles. For example, if a service account has both Viewer and Developer permissions, it uses a Developer license.
To add a service account, follow these steps:
1. Click the **Add** button to reveal a drop-down menu.
2. Click the **Service Account** menu item to open the **Add a new Service Account** page.
3. In the **Service Account Name** field, enter a name for the service account.
4. The **Create default set of API credentials** switch is enabled by default. If you don't want API credentials created for the account, click the switch to disable this option.
5. Select the [Groups](https://docs.cloud.google.com/looker/docs/admin-panel-users-groups.md.txt) and [Roles](https://docs.cloud.google.com/looker/docs/admin-panel-users-roles.md.txt) to assign to the service account.
6. Click the **Save** button.
You can view and edit existing service accounts in the **Service Accounts** tab on the **Users** page. To edit a service account, click the service account row to display the **Edit User** page. From the **Edit User** page you can do the following:
- Enable or disable the service account
- Edit the service account name
- Manage the service account [API keys](https://docs.cloud.google.com/looker/docs/admin-panel-users-users.md.txt#api_keys)
- Assign different [groups](https://docs.cloud.google.com/looker/docs/admin-panel-users-groups.md.txt) and [Roles](https://docs.cloud.google.com/looker/docs/admin-panel-users-roles.md.txt)
- Edit the [user attributes](https://docs.cloud.google.com/looker/docs/admin-panel-users-user-attributes.md.txt) that are associated with the service account
## Migrating user accounts to service accounts
> [!IMPORTANT]
> **Important:**
>
> Starting with the Looker 26.8 release, the following changes will occur:
>
> - Looker (original) admins will no longer be able to access or manage the API credentials of their standard users.
> - Looker (original) admins will be able to manage which users have access to individually owned API credentials.
> - Looker (original) users with access to API credentials will be able to access and manage their own API credentials.
>
> For more information, see the [Discontinuing the admin capability to create, view, and manage API credentials for a standard user](https://docs.cloud.google.com/looker/docs/best-practices/admin-managed-api-keys-deprecation.md.txt) deprecation notice.
In Looker (original) instances, certain standard user accounts can be migrated to [API-only service accounts](https://docs.cloud.google.com/looker/docs/admin-panel-users-users.md.txt#service-account). To be eligible to migrate, the standard user account must meet all of the following criteria:
- The account isn't using an identity provider, such as Google, SAML, or OpenID Connect, as their method of authentication into Looker.
- The account doesn't have a password set up for their email credentials.
- The user hasn't logged in to the Looker instance in the last seven days.
Looker flags standard users that meet these criteria in the **User** column of the **Standard Users** tab on the **Users** page. Additionally, a banner appears at the top of the **Users** page to indicate that some standard users are potential service accounts.
If a standard user account meets the criteria for migration, the following two options are available to migrate a standard account to a service account:
1. A **Migrate** option appears in the three-dot **Options** menu within the eligible user account's row. Select that menu item and a **Migrate user** dialog opens. Click **Migrate** to migrate the user. Click **Cancel** to exit the dialog without migrating.
2. Click the eligible user account's row to reach the [**Edit User** page](https://docs.cloud.google.com/looker/docs/admin-panel-users-users.md.txt#editing_users). At the bottom of the **Edit User** page, click the **Migrate** button. In the dialog that appears, click **OK** to confirm the migration or click **Cancel** to exit the dialog without migrating.
If a user account doesn't meet the criteria for migration, the migration options don't show for that user. However, if a user has an email and password login configured (indicated by a **Send Reset Link** button instead of **Send Setup Link** button), Looker requires seven consecutive days of zero activity to automatically trigger the migration prompt. Admins can use the [`DELETE /users/{user_id}/credentials_email`](https://docs.cloud.google.com/looker/docs/reference/looker-api/latest/methods/User/delete_user_credentials_email.md.txt) API endpoint to remove the email credential, which will immediately qualify the account for migration and bypass the seven-day inactivity requirement.
Migrating a user account to a service account doesn't create API credentials, but API credentials that are associated with the user account will be migrated to the service account.
> [!CAUTION]
> **Caution:** Migrating a user cannot be undone. If you want to undo a migration, you must delete the service account and add the user again as a standard user to the Looker instance.
## Editing users
To edit a user, click the user's row. On the **Edit User** page, adjust the following settings as needed.
### Account
Enable or disable a user's account. Consider [disabling the user account](https://docs.cloud.google.com/looker/docs/admin-panel-users-users.md.txt#disabling_users) instead of deleting it. This field appears only for standard users and service accounts.
### First Name
Add or edit the user's first name, if applicable. This field doesn't require a value, but it can be useful for organizational purposes. This field appears only for standard users and embed users.
### Last Name
Add or edit the user's last name, if applicable. This field doesn't require a value, but it can be useful for organizational purposes. This field appears only for standard users and embed users.
### Service Account Name
Edit the service account name. This field appears only for service accounts.
### Email
Add or edit the user's email address. When the user logs in to Looker, the email address serves as their username. This field appears only for standard users.
> [!WARNING]
> **Warning:** Editing a user's email address logs out that user and sends an email verification link to the user's new email address. Looker prevents the user from logging in again until they click the email verification link.
### Locale
The **Locale** field sets the user-interface language and model locale for a user. This field appears only for standard users.
If you want the user to view certain user interface (UI) text in a specific language, Looker supports the UI translations that are shown in the following table. Enter the code in the **Locale** field.
If you want the user to view a localized version of one or more data models, enter the title of the model's [strings file](https://docs.cloud.google.com/looker/docs/model-localization.md.txt#creating_locale_strings_files) for that locale in the **Locale** field.
If you want the user to view *both* model localization and Looker's built-in UI translations, the model's strings file should have the same name as the appropriate locale code in the following table; and that code should be entered in the **Locale** field.
To confirm the **Locale** setting, click **Save** at the bottom of the page.
| Language | Locale Code and Strings Filename |
|---|---|
| English | `en` |
| Czech | `cs_CZ` |
| German | `de_DE` |
| Spanish (Spain) | `es_ES` |
| Finnish | `fi_FI` |
| French (Canada) | `fr_CA` |
| French (France) | `fr_FR` |
| Hindi | `hi_IN` |
| Italian | `it_IT` |
| Japanese | `ja_JP` |
| Korean | `ko_KR` |
| Lithuanian | `lt_LT` |
| Norwegian (Bokmål) | `nb_NO` |
| Dutch | `nl_NL` |
| Polish | `pl_PL` |
| Brazilian Portuguese | `pt_BR` |
| Portuguese | `pt_PT` |
| Russian | `ru_RU` |
| Swedish | `sv_SE` |
| Thai | `th_TH` |
| Turkish | `tr_TR` |
| Ukrainian | `uk_UA` |
| Simplified Chinese | `zh_CN` |
| Traditional Chinese | `zh_TW` |
For users with no **Locale** set, Looker uses the locale chosen on the **Localization** page of the **Admin** panel as the default locale; and, if no locale is set there, Looker defaults to `en`.
#### Setting a custom locale
Looker developers can create custom locales to use for model localization only. Custom locale codes are designated by the titles of the [string files](https://docs.cloud.google.com/looker/docs/model-localization.md.txt#creating_locale_strings_files) that are created in the model localization process. To apply that custom locale to users, perform these steps:
1. Enter the custom locale code in the **Locale** field. As you begin typing in the field, any pre-existing text disappears.
2. Click **Create "your_custom_locale_code"**.
3. Click **Save** at the bottom of the page. The code will be added to the user's locale drop-down menu.
The Looker UI doesn't support custom locales. If you use a custom locale in a user's **Locale** field, that user's UI defaults to the language that is set in the [instance locale](https://docs.cloud.google.com/looker/docs/admin-panel-general-localization.md.txt).
### Number format
Looker's default number format setting for numbers that appear in data tables and visualizations is **1,234.56**. However, the number format can be set to any of the following:
- **1,234.56**: Thousands separated with commas; decimals separated with a period
- **1.234,56**: Thousands separated with periods; decimals separated with a comma
- **1 234,56**: Thousands separated with spaces; decimals separated with a comma
For more information and examples of using the **Number format** setting, see the [Localizing number formatting](https://docs.cloud.google.com/looker/docs/localizing-number-formatting.md.txt) documentation page.
This field appears only for standard users.
### Timezone
If you've enabled [User Specific Time Zones](https://docs.cloud.google.com/looker/docs/admin-panel-general-settings.md.txt#user_specific_time_zones) on your Looker instance, you can select the time zone that will be used when this user runs a query in Looker.
### Send setup link / Send reset link
If the user has never logged in, this button is labeled **Send setup link** . If the user has logged in previously, this button is labeled **Send reset link** . If you need to set or reset a password, you can click this button to send a link to the user's email address that you previously specified. See the [Password requirements](https://docs.cloud.google.com/looker/docs/admin-panel-authentiation-password) documentation page to learn about specifying password complexity requirements in Looker. If the user doesn't reset their password within one hour, the password's reset link will expire.
This field appears only for standard users.
### Two-Factor Secret
This option appears if you have enabled [two-factor authentication (2FA)](https://docs.cloud.google.com/looker/docs/admin-panel-authentication-two-factor.md.txt) on your instance. Click the **Reset** button to reset 2FA for the user. This causes Looker to prompt the user to rescan a QR code with the Google Authenticator app the next time they attempt to sign in to the Looker instance.
This field appears only for standard users.
### API Keys
An API key is used to access the [Looker API](https://docs.cloud.google.com/looker/docs/api-getting-started.md.txt). API keys have the same [permissions](https://docs.cloud.google.com/looker/docs/access-control-and-permission-management.md.txt) as the user account or service account from which they were created.
API keys are created in Looker and consist of a client ID and a client secret. Looker requires an API key to execute commands with the Looker API.
This field appears only for standard users and service accounts.
#### Individual standard users
Admins cannot create API keys for individual standard users. However, they can enable or disable the users' abilities to manage API keys for themselves.
To enable or disable a user's ability to manage their API keys, in the **Admin \> Users \> Edit User** page, use the **API Keys** field to enable or disable the ability for the user to create, view, and delete API keys for their user account.
Once you have enabled a user to manage their API keys, they can do that from their [**Account** page](https://docs.cloud.google.com/looker/docs/user-account.md.txt#api-keys).
Looker admins can monitor which users have the ability to manage API keys in the [**User** System Activity Explore](https://docs.cloud.google.com/looker/docs/usage-reports-with-system-activity-explores.md.txt#user), using the **Can Manage API3 Creds** field. Looker admins can monitor which users have API keys in the **User** System Activity Explore, using the **Has API Credentials** field.
Once a user sets up an API key, their entry on the **Users** page in the **Admin** panel will show **API** (in addition to any other types of Looker credentials they have) in the **Active Credential** column. Looker admins can also click the **View API Keys** button to open a user's **API Keys** page, where they can view the client IDs but not the client secrets for the user's API keys.
> [!NOTE]
> **Note:** Starting in Looker 25.18, Looker admins can no longer manage users' API keys on a Looker (Google Cloud core) instance. Therefore, we recommend any Looker (Google Cloud core) users who have API keys that were created prior to Looker 25.18 delete those existing API keys and create new API keys. New API keys add extra security since they are available only to the assigned user account.
#### API-only service accounts
Looker admins manage the API keys for [API-only service accounts](https://docs.cloud.google.com/looker/docs/admin-panel-users-users.md.txt#service-account).
To generate API keys for an API-only service account, in the **API Keys** section of the **Admin \> Users \> Edit User** page, click the **Manage** button. The **API Keys** page opens and shows any existing API keys. Click the **Create New API Key** button to generate a new key.
### Groups
Lists the groups the user is a member of. You can add the user to a new group by selecting the group from the drop-down, or remove the user from a group by clicking the `X` next to the group name in the list.
Users can also be added to groups on the [**Groups** page](https://docs.cloud.google.com/looker/docs/admin-panel-users-groups.md.txt) in the **Admin** panel.
### Roles
Lists the roles assigned to the user. You can add a new role to the user by selecting the role from the drop-down, or remove a role from the user by clicking the `X` next to the role name in the list.
Roles can also be added on the [**Roles** admin page](https://docs.cloud.google.com/looker/docs/admin-panel-users-roles.md.txt).
> [!NOTE]
> **Note:** If you need to remove a role from multiple users, avoid performing large bulk updates on the **Roles** page to prevent request timeouts and database rollbacks. If a bulk role change includes the protected initial system administrator (User ID: 1), the entire update will fail with a Validation (422) error. To safely remove roles, update users in smaller batches (under 10 users at a time), explicitly exclude the initial system administrator, or perform the role removals programmatically by using the [Looker Python SDK](https://github.com/looker-open-source/sdk-codegen/tree/main/python#looker-sdk).
### User attributes
Sets and unsets the values of a user's [user attributes](https://docs.cloud.google.com/looker/docs/admin-panel-users-user-attributes.md.txt). Values that are assigned to an individual user always override any values that are assigned as a result of membership in a group. System settings aren't editable.
### Troubleshooting 500 errors when saving a user
If you attempt to save a user's profile on the **Edit User** page (such as adding a role, group, or user attribute) and encounter a `500 Internal Server Error`, one possible cause is a query parameter limit constraint.
#### Cause
When you save a user profile from the **Edit User** page, the roles, groups, and user attributes are sent in the payload of the POST request. If your Looker instance has a very large number of these parameters configured, the total number can exceed the system's default query parameter limit (specifically, 4,096). When this threshold is exceeded, the server returns a 500 error.
#### Workarounds and solutions
To resolve or work around this error, try one of the following options:
- Assign roles by using the **Roles** admin page or API: To assign a role quickly without triggering this error, navigate to the [**Roles**](https://docs.cloud.google.com/looker/docs/admin-panel-users-roles.md.txt) page, edit the role, and add the user to that role. Alternatively, you can use the Looker API [`set_user_roles`](https://docs.cloud.google.com/looker/docs/reference/looker-api/latest/methods/User/set_user_roles.md.txt) method.
- Clean up unused user attributes: To resolve the underlying issue so that the **Edit User** UI functions normally, reduce the total number of user attributes that are configured in the instance. Delete unused user attributes by using the [**User Attributes**](https://docs.cloud.google.com/looker/docs/admin-panel-users-user-attributes.md.txt) admin page or by using the Looker API.
## Removing user access
To remove a user account's or service account's access to Looker, you can either disable or delete the account. For most situations, the best practice is to disable the account.
Differences between disabling and deleting an account are described in the following table:
| Description | Disabled | Deleted |
|---|---|---|
| The user can sign in to the Looker instance | No | No |
| The user's personal folder | Still exists | Deleted |
| Looks and dashboards in the user's personal folder | Still exist | Moved to the [Trash](https://docs.cloud.google.com/looker/docs/admin-spaces.md.txt#trash) folder |
| Looks and dashboards the user saved to a Shared folder | Still exist in the Shared folder | Still exist in the Shared folder |
| Schedules created by the user | Schedules are disabled | Schedules are deleted |
| Schedules based on the user's content, but created by another user | Schedules continue to run | User's content is deleted; schedules based on that content are deleted |
| Schedules that list the user as a recipient and are created by another user with the ability to deliver content to external email accounts | Schedules will continue to run and deliver normally (user will be treated as an external user) | Schedules continue to run and deliver normally (user will be treated as an external user) |
| Schedules that have **Run schedule as recipient** enabled and list the user as a recipient | Schedules will continue to run but will fail to deliver to the disabled user upon next run | Schedules continue to run but will fail to deliver to all users with error `run_as_recipient was specified on ScheduledPlan but recipient is not a Looker user` |
| Boards created by the user | Still exist | Still exist |
| Alerts created by the user | Remain active, but are not visible or editable from the dashboard on which the alert is set unless self-assigned by an admin. Admins can edit or self-assign the alert from the [**Alerts**](https://docs.cloud.google.com/looker/docs/admin-panel-alerts-and-schedules-alerts.md.txt) management admin page in the **Admin** panel. | Alerts are deleted immediately from dashboards and from the [**Alerts**](https://docs.cloud.google.com/looker/docs/admin-panel-alerts-and-schedules-alerts.md.txt) management admin page in the **Admin** panel. |
| Historical usage information for the user | Kept | Most are deleted |
### Disabling users
To prevent a user account's or a service account's access to Looker, it is typically best practice to disable the account. When you disable an account, the account's usage history and personal content is retained. For details about the differences between disabling and deleting accounts, see the table in the [Removing user access](https://docs.cloud.google.com/looker/docs/admin-panel-users-users.md.txt#removing_user_access) section on this page.
If you are using a [Looker (Google Cloud core) instance](https://docs.cloud.google.com/looker/docs/looker-core-overview.md.txt), disabling a user won't affect that user's [IAM permissions](https://docs.cloud.google.com/looker/docs/looker-core-access-control.md.txt). [Remove](https://docs.cloud.google.com/iam/docs/granting-changing-revoking-access.md.txt#revoke-single-role) Looker IAM permissions to ensure a user can't access the instance.
To disable an account, you can select **Disable** from the three-dot **Options** menu to the right of the user's row.

### Deleting users
> [!CAUTION]
> **Caution:** Deleting a user is irreversible. Consider your organization's compliance and security needs before doing so.
Instead of deleting a user, consider [disabling the user account](https://docs.cloud.google.com/looker/docs/admin-panel-users-users.md.txt#disabling_users) instead. This prevents a user from being able to sign in, but their information, content, and history remain intact. For details about the differences between disabling and deleting users, see the table in the [Removing user access](https://docs.cloud.google.com/looker/docs/admin-panel-users-users.md.txt#removing_user_access) section on this page.
If you are using a [Looker (Google Cloud core) instance](https://docs.cloud.google.com/looker/docs/looker-core-overview.md.txt), deleting a user won't affect that user's [IAM permissions](https://docs.cloud.google.com/looker/docs/looker-core-access-control.md.txt). [Remove](https://docs.cloud.google.com/iam/docs/granting-changing-revoking-access.md.txt#revoke-single-role) Looker IAM permissions to ensure a user can't access the instance.
To delete an account, you can perform either of the following actions:
- From the three-dot **Options** menu to the right of the account's row, select **Delete**.
- On the account's **Edit User** page, click the **Delete** button.

Deleting users from a Looker account that is [associated with a Data Studio Pro subscription](https://docs.cloud.google.com/looker/docs/admin-panel-platform-lsp) reduces the number of complimentary Data Studio Pro licenses that are allocated to the account. If the number of complimentary Pro licenses that are allocated to your account becomes less than the number of licenses that are in use, the difference will be converted within 24 hours to paid licenses, subject to Data Studio Pro [pricing](https://cloud.google.com/data-studio#pricing).
## Impersonating (sudoing) users
Sudoing lets you navigate Looker as if you were a different user, with all of their privileges and abilities.
Sudoing is also a useful way to validate that you've properly configured permissions and other features or to view a user's LookML development before they've committed and pushed changes.
The `see_users` and `sudo` [permissions](https://docs.cloud.google.com/looker/docs/admin-panel-users-roles.md.txt#permission_sets) are both required to sudo as another user. Admins can sudo as any other user, including other admins. Non-admin users can only sudo as other non-admin users.
To sudo as a user, select **Sudo as this user** from the three-dot **Options** menu to the right of the user's row:

A bar at the top of the screen warns you that you're in a sudoed state. That lets you exit the sudoed state. Any changes made in this state will impact the user that you're emulating.
If you are in [Development Mode](https://docs.cloud.google.com/looker/docs/dev-mode-prod-mode.md.txt), your changes are not visible to other users until you [deploy your changes to production](https://docs.cloud.google.com/looker/docs/version-control-and-deploying-changes.md.txt#deploy_to_production). If you haven't deployed your changes for other users to see, you won't see your changes when you sudo as a different user.
There are several points to understand when sudoing as another user:
- Sudoing as a [signed embed](https://docs.cloud.google.com/looker/docs/single-sign-on-embedding) user and interacting with a Looker instance directly and not through an embedded iframe can cause unexpected results. In addition to any restrictions from their regular permissions, signed embed users are restricted by the embedded iframe. However, those restrictions may not be present when someone is sudoing as a signed embed user and interacts outside of an iframe.
- For database connections that use OAuth, such as [Snowflake](https://docs.cloud.google.com/looker/docs/db-config-snowflake.md.txt#oauth), [Google BigQuery](https://docs.cloud.google.com/looker/docs/db-config-google-bigquery.md.txt#oauth_for_bigquery_connections), [Trino](https://docs.cloud.google.com/looker/docs/db-config-prestodb-and-trino.md.txt#configuring_oauth_for_trino_connections), and [Databricks](https://docs.cloud.google.com/looker/docs/db-config-databricks.md.txt#oauth-db-configure), an administrator who is sudoing as another user uses the sudoed user's OAuth access token when they run queries. When users authorize an OAuth database connection in Looker, an **Authorize OAuth Connection** dialog notifies them that privileged Looker users, such as administrators or developers, might have visibility into their data. If the user's access token is expired, the administrator can't create a new token on behalf of the sudoed user; the user must sign in to the database and reauthorize Looker.
- When you sudo as another user, that user's API keys won't be revealed to you.
- You can sudo only as a standard user; it isn't possible to sudo as a service account.