> [!CAUTION]
> **Caution** : Document AI Warehouse is deprecated and will no longer be available on Google Cloud after January 16, 2025. To safeguard your data, migrate any documents currently saved in Document AI Warehouse to an alternative like Cloud Storage. Verify that your data migration is completed before the discontinuation date to prevent any data loss. See [Deprecations](https://docs.cloud.google.com/document-warehouse/docs/deprecations) for details.
> [!WARNING]
>
> **Preview**
>
>
> This feature is
>
> subject to the "Pre-GA Offerings Terms" in the General Service Terms section of the
> [Service Specific
> Terms](https://docs.cloud.google.com/terms/service-terms#1).
>
> Pre-GA features are available "as is" and might have limited support.
>
> For more information, see the
> [launch stage descriptions](https://cloud.google.com/products/#product-launch-stages).
## Introduction to BigQuery connector
The BigQuery connector helps you to export the document's metadata
(including properties) stored in Document AI Warehouse into your
[BigQuery](https://docs.cloud.google.com/BigQuery) table. With your data in
BigQuery, you can run analysis, create reports and dashboards to help
you make business decisions.
To enable the BigQuery connector, you need to set up a
BigQuery table with necessary permissions granted, and configure the
asynchronous tasks through the API. The BigQuery connector exports the
data from the Document AI Warehouse
to your BigQuery tables.
## Before you start
Set up Document AI Warehouse, and ingest your documents. For more information, follow
the [quick start](https://docs.cloud.google.com/document-warehouse/docs/quickstart).
You must ensure that the project that hosts your BigQuery table is the
same project used by Document AI Warehouse to store your documents. In other words,
the data must always be exported from the Document AI Warehouse to BigQuery
table in the same project.
In the project, you must have the `Owner` (`roles/owner`) role, or you
must have the `resourcemanager.projects.getIamPolicy` and the `resourcemanager.projects.setIamPolicy`
permissions.
> [!NOTE]
> **Note:** Access to this feature is currently restricted. Fill out the [BigQuery
> Connector and DocAI Pipeline Program
> form](https://docs.google.com/forms/d/e/1FAIpQLSeoym42tuUIIpiQMbV8YS3NXsM5mNEWDgNd5Ltb3yC9m9FyLA/viewform) to gain access.
## Set up BigQuery Access
Bind the service account `doc-ai-warehouse-dw-bq-connector@system.gserviceaccount.com`
to the `BigQuery Admin` role:
gcloud projects add-iam-policy-binding PROJECT_ID --member serviceAccount:doc-ai-warehouse-dw-bq-connector@system.gserviceaccount.com --role=roles/bigquery.admin
## Set up BigQuery dataset and table
Set up a BigQuery dataset and table for Document AI Warehouse
to export the data. If you don't have a BigQuery dataset, follow
[creating datasets](https://docs.cloud.google.com/bigquery/docs/datasets) to create one.
Create a BigQuery table in your BigQuery dataset. Following
the [BigQuery
instructions](https://docs.cloud.google.com/bigquery/docs/reference/standard-sql/data-definition-language#running_ddl_statements),
you create tables with the DDL sample statements:
CREATE TABLE `PROJECT_ID.DATASET_NAME.TABLE_NAME`
(
project_number INT64,
location STRING,
mod_type STRING,
document_id STRING,
document_json JSON,
create_time TIMESTAMP,
creator STRING,
update_time TIMESTAMP,
updater STRING,
document_state STRING,
export_time TIMESTAMP
)
PARTITION BY TIMESTAMP_TRUNC(export_time, HOUR)
OPTIONS(
partition_expiration_days=150,
description="table partitioned by export_time on hour with expiry"
);
The DDL creates a new BigQuery table for you. The table is hourly
time-partitioned, and the partition is deleted in 150 days.
> [!NOTE]
> **Note:** Each partitioned table can have a total of 4,000 partitions. This means that for a daily synced table, there can be 4,000 days (about 10.95 years) of data, and for hourly synced tables, there can be 4,000 hours (about 166 days). For more information on partitioned tables limits, see [BigQuery Limitations](https://docs.cloud.google.com/bigquery/quotas#partitioned_tables).
> [!NOTE]
> **Note:** Do not reuse the same BigQuery database table for different data export jobs. This will cause duplicate records to be exported to the table. Each data export job should correspond to its own BigQuery table.
## Configure BigQuery connector
### Create data export configuration
The following instructions create a new data export job, which sets up the
asynchronous jobs to export data. We recommend starting with an empty table for
each new data export job. Refer to the [API
reference](https://docs.cloud.google.com/document-warehouse/docs/reference/rest/v1/projects.locations.dataExportJobs)
for the details of the configuration.
You have the following running options. They can be configured using the
`FREQUENCY`.
Refer to the [API
reference](https://docs.cloud.google.com/document-warehouse/docs/reference/rest/v1/projects.locations.dataExportJobs#frequency).
- **ADHOC:** The job runs only once. All data is exported to your BigQuery table.
- **DAILY:** The job runs daily. For the first run, all of the data are exported to your BigQuery table. Once the initial export is complete, only the previous day's data changes (or the delta from last successful synchronization) are exported to your BigQuery table.
- **HOURLY:** The job runs hourly. For the first run, all of the data are exported to your BigQuery table. Once the initial export is complete, only previous hour's data changes (or the delta from last successful synchronization) are exported to your BigQuery table.
Before using any of the request data,
make the following replacements:
- PROJECT_NUMBER: your Google Cloud project number
- LOCATION: your Document AI Warehouse location (such as \`us\`)
- DATASET_LOCATION: your dataset location
- DATASET_NAME: your dataset name
- TABLE_NAME: your table name
- FREQUENCY: one of `ADHOC`, `DAILY` or `HOURLY`.
Request JSON body:
```
{
"projectNumber": PROJECT_NUMBER,
"location": "DATASET_LOCATION",
"dataset": "DATASET_NAME",
"table": "TABLE_NAME",
"frequency": "FREQUENCY",
"state": "ACTIVE"
}
```
To send your request, expand one of these options:
#### curl (Linux, macOS, or Cloud Shell)
> [!NOTE]
> **Note:** Ensure you have set the [`GOOGLE_APPLICATION_CREDENTIALS`](https://docs.cloud.google.com/docs/authentication/set-up-adc-local-dev-environment#local-key) environment variable to the path for your service account private key file.
Save the request body in a file named `request.json`.
Run the following command in the terminal to create or overwrite
this file in the current directory:
```
cat > request.json << 'EOF'
{
"projectNumber": PROJECT_NUMBER,
"location": "DATASET_LOCATION",
"dataset": "DATASET_NAME",
"table": "TABLE_NAME",
"frequency": "FREQUENCY",
"state": "ACTIVE"
}
EOF
```
Then execute the following command to send your REST request:
```
curl -X POST \
-H "Authorization: Bearer $(gcloud auth application-default print-access-token)" \
-H "Content-Type: application/json; charset=utf-8" \
-d @request.json \
"https://contentwarehouse.googleapis.com/v1/projects/PROJECT_NUMBER/locations/LOCATION/dataExportJobs"
```
#### PowerShell (Windows)
> [!NOTE]
> **Note:** Ensure you have set the [`GOOGLE_APPLICATION_CREDENTIALS`](https://docs.cloud.google.com/docs/authentication/set-up-adc-local-dev-environment#local-key) environment variable to the path for your service account private key file.
Save the request body in a file named `request.json`.
Run the following command in the terminal to create or overwrite
this file in the current directory:
```
@'
{
"projectNumber": PROJECT_NUMBER,
"location": "DATASET_LOCATION",
"dataset": "DATASET_NAME",
"table": "TABLE_NAME",
"frequency": "FREQUENCY",
"state": "ACTIVE"
}
'@ | Out-File -FilePath request.json -Encoding utf8
```
Then execute the following command to send your REST request:
```
$cred = gcloud auth application-default print-access-token
$headers = @{ "Authorization" = "Bearer $cred" }
Invoke-WebRequest `
-Method POST `
-Headers $headers `
-ContentType: "application/json; charset=utf-8" `
-InFile request.json `
-Uri "https://contentwarehouse.googleapis.com/v1/projects/PROJECT_NUMBER/locations/LOCATION/dataExportJobs" | Select-Object -Expand Content
```
You should receive a JSON response similar to the following:
#### Response
```
{
"projectNumber": "1234567890",
"location": "us",
"dataset": "datasetX",
"table": "tableA",
"frequency": "DAILY",
"id": "fd3f3576-c42c-4f7e-8a1a-ae69189da6e4",
"createTime": "2023-03-21T17:57:01.556230Z",
"updateTime": "2023-03-21T17:57:01.556230Z"
}
```
> [!IMPORTANT]
> **Important:** Record the job ID (the `id` field), which is needed when you delete the job.
> [!NOTE]
> **Note:** Currently, Document AI Warehouse doesn't support modifying an existing job. If you want to modify an existing job, you need to delete it and create a new one.
### Job execution
Once you have successfully created a job, the job runs based on your
configuration. Note that the jobs run asynchronously because it takes time to
execute. Depending on the amount of data to be exported, the first run can take
time to finish. For daily job, allow 24 hours for the results to show in the
BigQuery table.
### Delete data export configuration
The following command deletes (by archiving) a job that you created.
Before using any of the request data,
make the following replacements:
- PROJECT_NUMBER: your Google Cloud project number
- LOCATION: your Document AI Warehouse location (such as \`us\`)
- JOB_ID: your job ID, in the response when you created it
Request JSON body:
```
{}
```
To send your request, expand one of these options:
#### curl (Linux, macOS, or Cloud Shell)
> [!NOTE]
> **Note:** Ensure you have set the [`GOOGLE_APPLICATION_CREDENTIALS`](https://docs.cloud.google.com/docs/authentication/set-up-adc-local-dev-environment#local-key) environment variable to the path for your service account private key file.
Save the request body in a file named `request.json`.
Run the following command in the terminal to create or overwrite
this file in the current directory:
```
cat > request.json << 'EOF'
{}
EOF
```
Then execute the following command to send your REST request:
```
curl -X DELETE \
-H "Authorization: Bearer $(gcloud auth application-default print-access-token)" \
-H "Content-Type: application/json; charset=utf-8" \
-d @request.json \
"https://contentwarehouse.googleapis.com/v1/projects/PROJECT_NUMBER/locations/LOCATION/dataExportJobs/JOB_ID"
```
#### PowerShell (Windows)
> [!NOTE]
> **Note:** Ensure you have set the [`GOOGLE_APPLICATION_CREDENTIALS`](https://docs.cloud.google.com/docs/authentication/set-up-adc-local-dev-environment#local-key) environment variable to the path for your service account private key file.
Save the request body in a file named `request.json`.
Run the following command in the terminal to create or overwrite
this file in the current directory:
```
@'
{}
'@ | Out-File -FilePath request.json -Encoding utf8
```
Then execute the following command to send your REST request:
```
$cred = gcloud auth application-default print-access-token
$headers = @{ "Authorization" = "Bearer $cred" }
Invoke-WebRequest `
-Method DELETE `
-Headers $headers `
-ContentType: "application/json; charset=utf-8" `
-InFile request.json `
-Uri "https://contentwarehouse.googleapis.com/v1/projects/PROJECT_NUMBER/locations/LOCATION/dataExportJobs/JOB_ID" | Select-Object -Expand Content
```
You should receive a JSON response similar to the following:
#### Response
```
{
"projectNumber": "216122811947",
"location": "us",
"dataset": "datasetX",
"table": "tableA",
"frequency": "DAILY",
"state": "ARCHIVED",
"id": "fd3f3576-c42c-4f7e-8a1a-ae69189da6e4",
"createTime": "2023-03-21T17:57:01.556230Z",
"updateTime": "2023-03-21T20:59:44.820355Z"
}
```
After this, your export job is deleted (archived) and Document AI Warehouse doesn't
run it any more.
## Explore data ingested into BigQuery
To extract document metadata and properties into distinct table fields in
BigQuery for your analysis needs, you can use the sample DDL queries
below. These extracted fields can also be used in Data Studio or any
BI Dashboard tool to visualize relationships within the data.
### Extract key fields from document_json
This query selects relevant fields from the data export including key fields
from document metadata (stored in the document_json field).
DROP VIEW IF EXISTS
`DATASET_NAME.VIEW_NAME_1`;
CREATE VIEW
`DATASET_NAME.VIEW_NAME_1` AS
SELECT
project_number,
document_id,
mod_type,
create_time,
update_time,
location,
creator,
updater,
document_state,
SPLIT(JSON_EXTRACT_SCALAR(document_json,'$.documentSchemaName' ), '/')[SAFE_OFFSET(ARRAY_LENGTH(SPLIT(JSON_EXTRACT_SCALAR(document_json,'$.documentSchemaName' ), '/')) - 1)] AS document_schema_name,
JSON_EXTRACT_SCALAR(document_json,'$.name') AS document_name,
JSON_EXTRACT_SCALAR(document_json,'$.rawDocumentFileType')
AS raw_document_file_type,
JSON_EXTRACT(document_json,'$.properties') AS properties
FROM
`DATASET_NAME.SYSTEM_METADATA_AND_DOC_PROPERTIES_TABLE_EXPORT_NAME`;
### Unnesting properties from document_json
This query unnests properties from the document metadata (document_json) to
create key value pairs (property name, value). These key value pairs will be
transformed to individual table fields in the next query to enable
property-level data exploration and dashboard visualization.
DROP VIEW IF EXISTS
`DATASET_NAME.VIEW_NAME_2`;
CREATE VIEW
`DATASET_NAME.VIEW_NAME_2` AS
SELECT
* EXCEPT(key_value_pair,
properties,raw_document_file_type)
FROM (
SELECT
*,
REPLACE(JSON_VALUE(key_value_pair,'$.name'),'/','-') property_name,
-- Note: values are either text OR float values
CASE
WHEN JSON_VALUE(key_value_pair,'$.textValues.values[0]') IS NULL THEN JSON_VALUE(key_value_pair,'$.floatValues.values[0]')
ELSE
JSON_VALUE(key_value_pair,'$.textValues.values[0]')
END
AS value,
CASE
WHEN raw_document_file_type IS NULL THEN "RAW_DOCUMENT_FILE_TYPE_UNSPECIFIED"
ELSE
raw_document_file_type
END
AS document_file_type
FROM
`DATASET_NAME.VIEW_NAME_1`,
UNNEST(JSON_EXTRACT_ARRAY(properties)) AS key_value_pair);
### Pivoting properties from document_json to create table fields in BigQuery
The following procedures create a table with all of the document properties
transformed as individual table fields by pivoting the properties and associated
values. The results of this table can be leveraged to derive further insights
through subsequent queries in Data Studio and in other BI
visualization tools.
DECLARE
property_field STRING;
-- Extracting distinct property_names from the previous view and storing it in property_field, declared above
EXECUTE IMMEDIATE
"""SELECT string_agg(CONCAT("'",property_name,"'")) from (select distinct property_name from DATASET.VIEW_NAME_2)""" INTO property_field;
DROP TABLE IF EXISTS `DATASET_NAME.ANALYTICS_TABLE_NAME`;
-- Creating pivot table with the aid of extracted distinct property_names
-- Casting numerical values to float/int
-- Pivot on property_name and value (ie. create a new column for each of the property_name, substitute the value)
EXECUTE IMMEDIATE
FORMAT ("""
CREATE TABLE `DATASET_NAME.ANALYTICS_TABLE_NAME` AS
SELECT * FROM `DATASET_NAME.VIEW_NAME_2`
PIVOT(min(value) FOR property_name IN (%s))""", property_field);
### Data Cleaning \& Transformation Procedures (Business Case Specific)
Depending on the data ingested into BigQuery, you might need to perform
additional data cleaning and transforming procedures to enable further analysis.
Such procedures vary from case to case (dataset to dataset) and should be
performed as appropriate.
Some examples of data cleaning procedures might include (not limited to):
- Unifying date formats.
- Consolidating property values.
- Casting data types to strings, floats, and integers, for example.
### Visualizing the data in Data Studio
Once your data has been extracted, cleansed, and transformed in
BigQuery, your final dataset can be exported to Data Studio
for visual
[analysis](https://cloud.google.com/bigquery/docs/visualize-looker-studio).
## Looker Dashboards
The sample dashboards outlined showcase possible visualizations that can be
created from your dataset. In this scenario, the sample data export from
Document AI Warehouse consists of W2s \& Invoices (two schemas).
[Public Facing Looker Dashboards](https://lookerstudio.google.com/reporting/91cfaeb3-fb67-4921-9ea9-d3faf122ee9a/page/tEnnC)
### Sample view: Document AI Warehouse analytics overview
The following dashboard provides you with high-level insight into the variety of
documents ingested into your Document AI Warehouse instance.
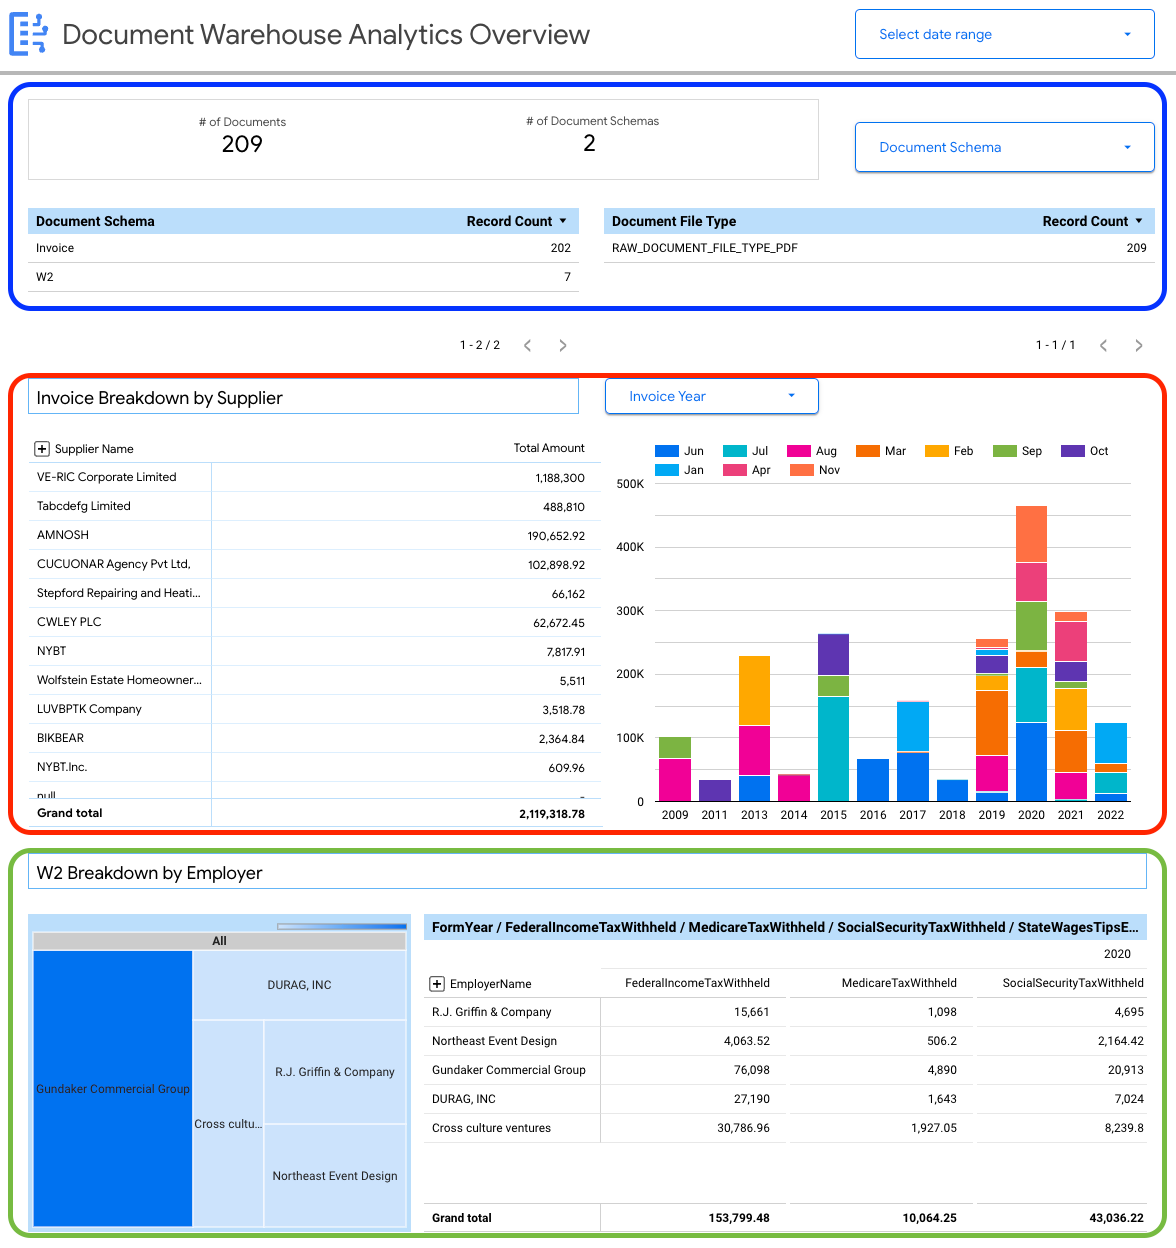
You are able to view document-level details including:
- Total number of documents.
- Total number of document schemas.
- Record count by document schema.
- Document file type (such as PDF, text, unspecified type\]).
You are further able to use properties extracted from the document metadata
(document_json) to build key breakdowns for the Invoices and W2s ingested into
BigQuery.
### Sample view: business-specific insights dashboard (invoices)
The following dashboard provides the user with a detailed look into a single
document schema (invoices) to enable insights on all of the invoices ingested
into Document AI Warehouse.
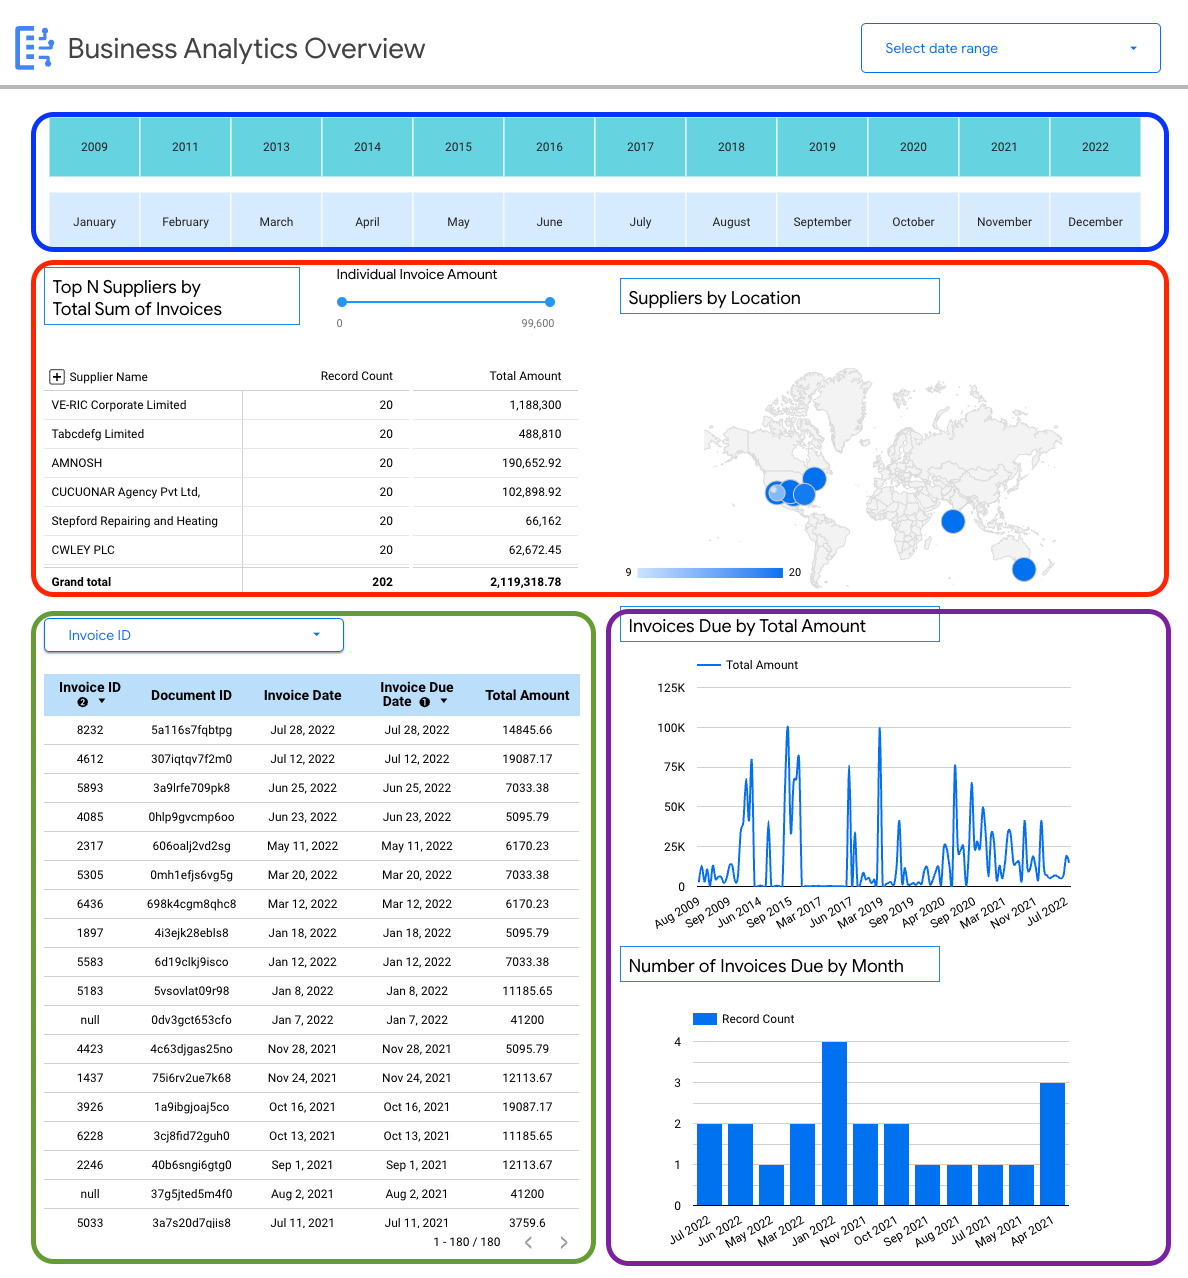
You are able to view schema-specific details on invoices, for example:
- Top suppliers by invoice amounts.
- Suppliers by location.
- Invoice dates and their corresponding due dates.
- Trends in invoices month over month by amount and record count.
### Connecting data source to dashboards
To use these [dashboard
samples](https://lookerstudio.google.com/reporting/91cfaeb3-fb67-4921-9ea9-d3faf122ee9a/page/tEnnC)
as a starting point to visualize your dataset, you can connect your data source
from BigQuery.
> [!NOTE]
> **Note:** The sample dashboards provided are specific to the properties available in the sample dataset used, including invoices and W2s. If you choose to make a copy and connect your dataset, the properties referenced in the sample dashboard widgets are updated to reflect your extracted properties for your business use case.
Before connecting the sample dashboards to your BigQuery data source,
ensure you are signed in to your account associated with your Google Cloud
environment.

Select the highlighted button to reveal dropdown options.

Select **Make a Copy**.
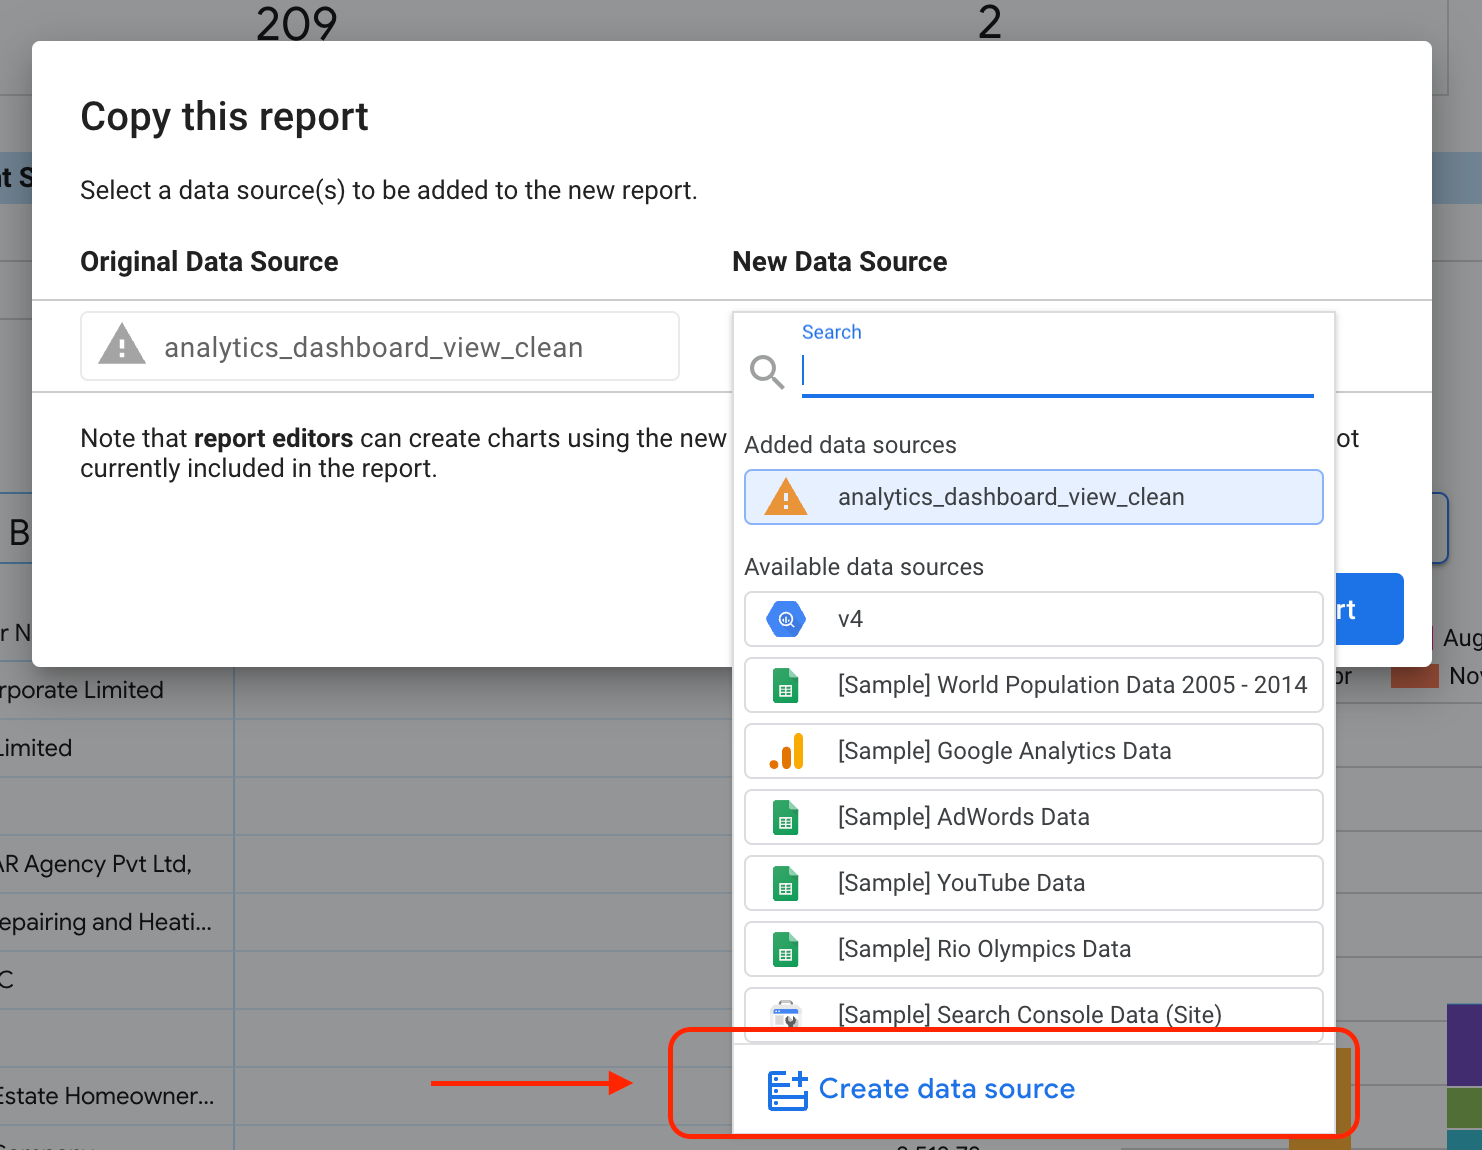
Under the New Data Source subsection, select **Create data source**.
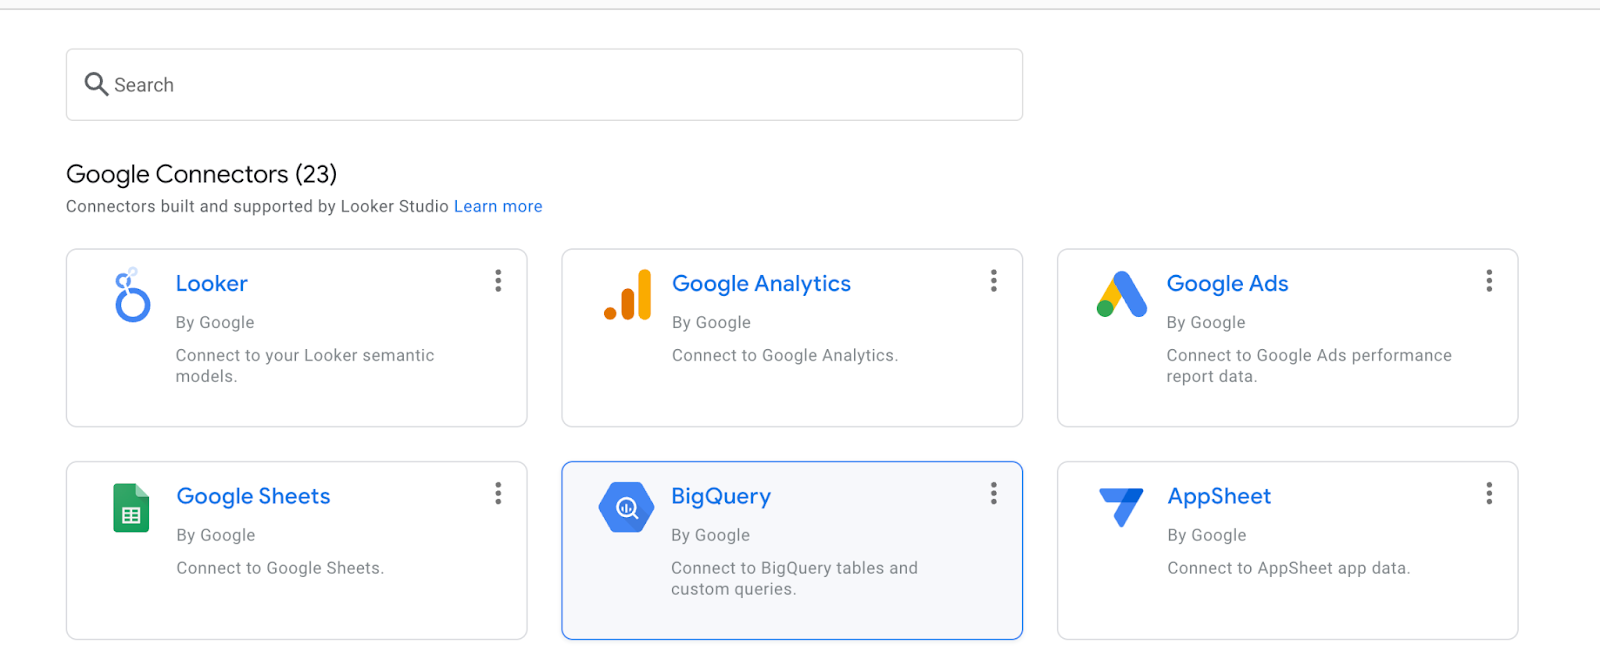
Select **BigQuery**.
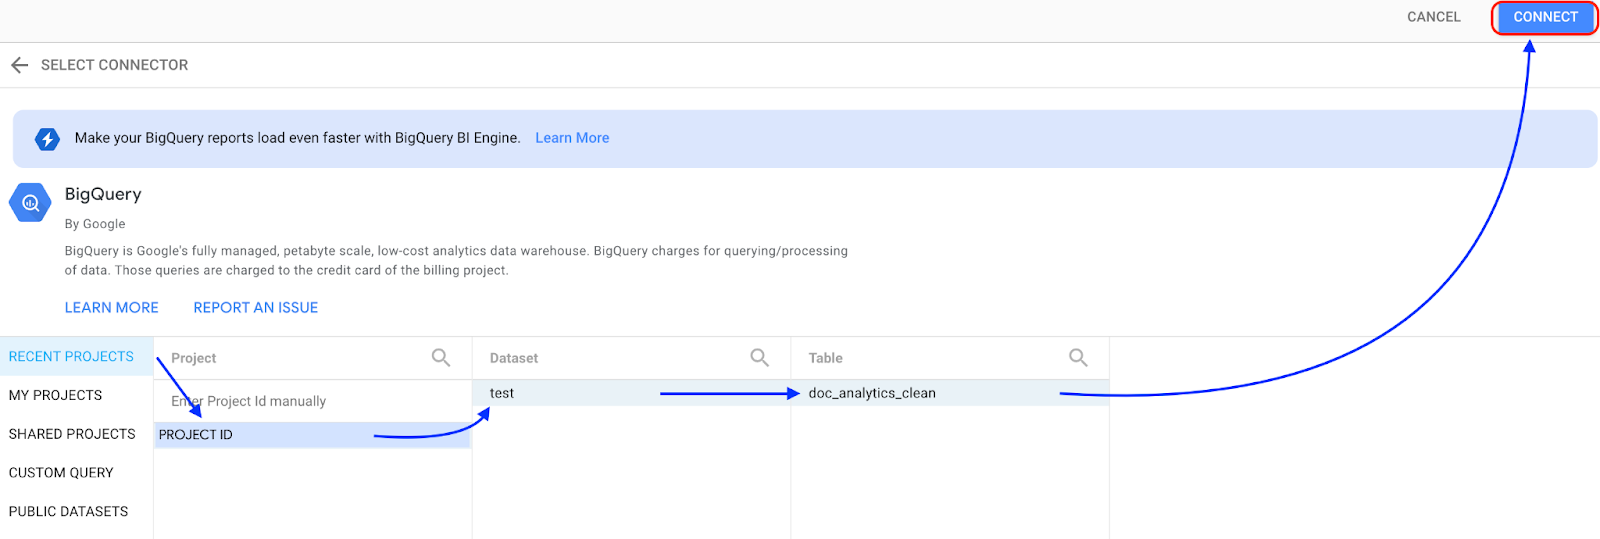
Select the project where your dataset is stored, then follow the prompts to
select your dataset and table. Click **Connect**.

Click **Add to Report**.
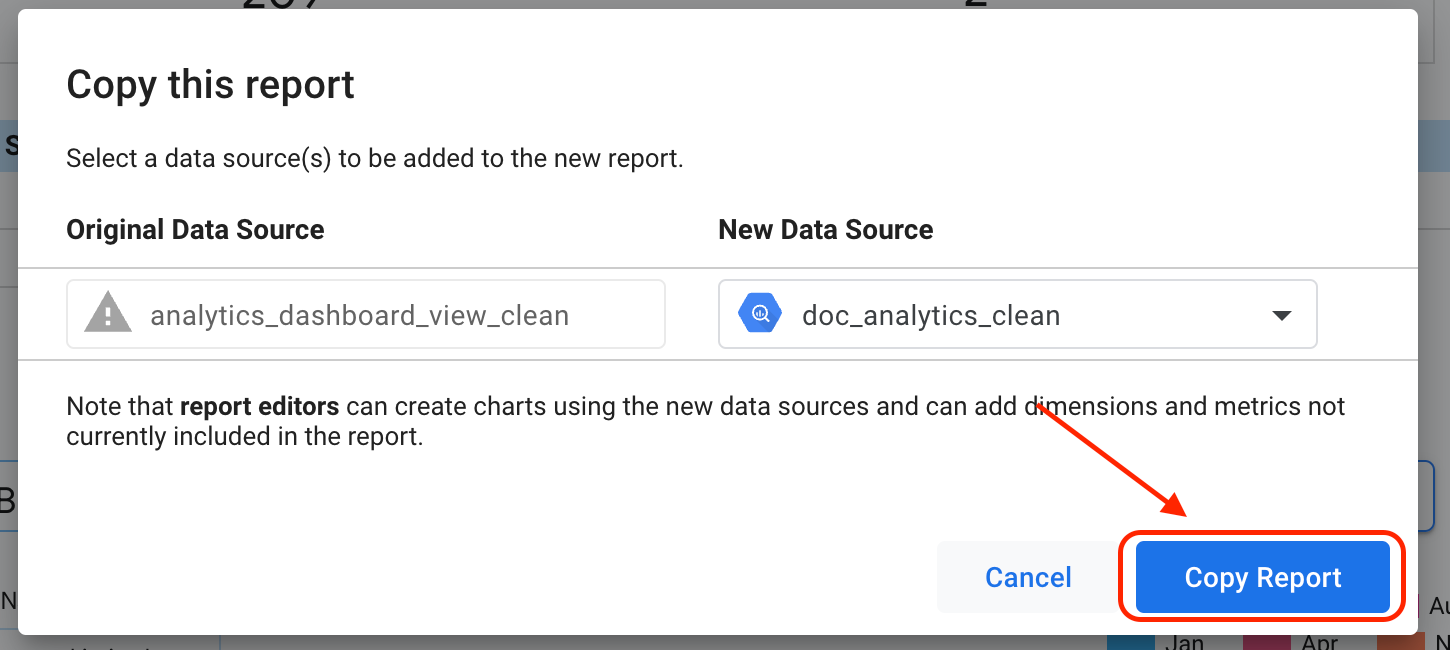
Click **Copy Report**.
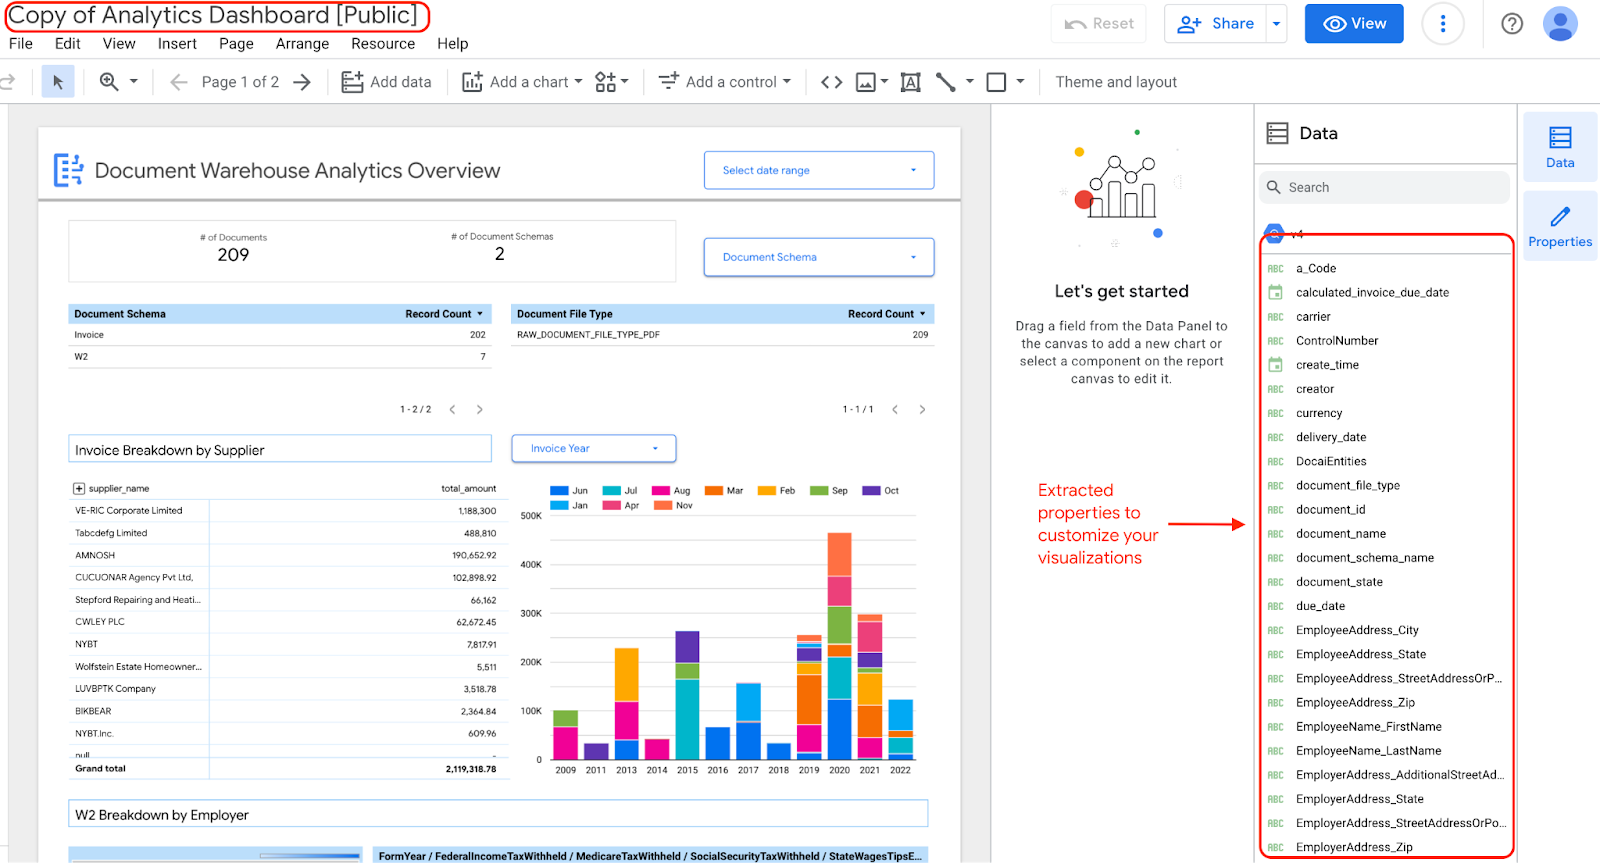
If you choose to edit and update the widgets on your dashboard, you can edit it,
because you have a copy of the dashboard with the extracted properties.