# Analyze your application using metrics
This quickstart shows you how to use Cloud Deploy to analyze your deployed
Cloud Run service, based on metrics from Google Cloud Observability, to ensure the
application is performing as expected.
In this quickstart, you'll do the following:
1. Create and deploy one Cloud Run service.
In this case, you won't use Cloud Deploy to deploy it.
2. Create an [uptime check](https://docs.cloud.google.com/monitoring/uptime-checks) in Google Cloud Observability.
This check monitors your Cloud Run service to make sure it's
running.
3. Create an alert policy in Cloud Monitoring.
By default, Cloud Deploy analysis can use many types of metrics
from Google Cloud Observability. This policy creates an alert if an uptime check indicates
a problem.
4. Create a [Skaffold](https://cloud.google.com/skaffold) configuration to
identify the Cloud Run service.
5. Define your Cloud Deploy delivery pipeline and target.
This pipeline includes only one stage and uses only one target, and includes
the definition for an analysis job.
6. Create a release, which automatically deploys to the target.
After the application is deployed, the
[analysis](https://docs.cloud.google.com/deploy/docs/analysis) runs as a
[job](https://docs.cloud.google.com/deploy/docs/deployment-strategies/manage-rollout#jobs_and_job_runs) in
the rollout.
The service should deploy successfully to the target, but the rollout should
fail because the alert policy will generate an alert.
7. Change the Cloud Run service definition to increase the
instance count for the service, and create a new release.
This time, the service will deploy successfully, and the rollout will
complete successfully.
## Before you begin
### Required roles
To ensure that the Cloud Deploy service account has the necessary
permissions to run Cloud Deploy operations and deploy to Cloud Run,
ask your administrator to grant the
following IAM roles to the Cloud Deploy service account on your project:
**Important:** You must grant these roles to the Cloud Deploy service account, *not* to your user account. Failure to grant the roles to the correct principal might result in permission errors.
- [Cloud Run Developer](https://docs.cloud.google.com/iam/docs/roles-permissions/run#run.developer) (`roles/run.developer`)
- [Cloud Deploy Runner](https://docs.cloud.google.com/iam/docs/roles-permissions/clouddeploy#clouddeploy.jobRunner) (`roles/clouddeploy.jobRunner`)
- [IAM Service Account User](https://docs.cloud.google.com/iam/docs/roles-permissions/iam#iam.serviceAccountUser) (`roles/iam.serviceAccountUser`)
- [Monitoring Alert Viewer](https://docs.cloud.google.com/iam/docs/roles-permissions/monitoring#monitoring.alertViewer) (`roles/monitoring.alertViewer`)
- [Service Usage Consumer](https://docs.cloud.google.com/iam/docs/roles-permissions/serviceusage#serviceusage.serviceUsageConsumer) (`roles/serviceusage.serviceUsageConsumer`)
For more information about granting roles, see [Manage access to projects, folders, and organizations](https://docs.cloud.google.com/iam/docs/granting-changing-revoking-access).
Your administrator might also be able to give the Cloud Deploy service account
the required permissions through [custom
roles](https://docs.cloud.google.com/iam/docs/creating-custom-roles) or other [predefined
roles](https://docs.cloud.google.com/iam/docs/roles-overview#predefined).
[Learn more](https://docs.cloud.google.com/deploy/docs/cloud-deploy-service-account#execution-service-account)
about the Cloud Deploy service account.
## Deploy a Cloud Run service
This quickstart uses an alerting policy that requires that the
Cloud Run already exist. So we'll deploy one here, and in a later
section we'll define a `service.yaml` using the same service name.
Run the following command to create the initial service:
gcloud run deploy my-analysis-run-service \
--image=us-docker.pkg.dev/cloudrun/container/hello@sha256:95ade4b17adcd07623b0a0c68359e344fe54e65d0cb01b989e24c39f2fcd296a \
--project=PROJECT_ID \
--region=us-central1 \
--allow-unauthenticated
Replace `PROJECT_ID` with your project ID.
## Create a Google Cloud Observability uptime check
This uptime check monitors your running service to confirm that it's running.
In a later section, you create a Google Cloud Observability alert policy that generates
an alert if your service doesn't have at least one available instance running.
1. To create the uptime check, run the following command:
gcloud monitoring uptime create my-analysis-run-service-cloud-run-uptime-check \
--resource-type=cloud-run-revision \
--resource-labels="project_id=PROJECT_ID,location=us-central1,service_name=my-analysis-run-service" \
--project=PROJECT_ID \
--protocol=https \
--path="/" \
--port=443 \
--period=1 \
--timeout=10 \
--service-agent-auth="oidc-token" \
--status-classes="2xx"
2. Copy the uptime check ID.
The output from the command you just ran contains the ID.
## Prepare your Skaffold configuration and service definition
In this quickstart, you create a `skaffold.yaml` file, which identifies the
manifest to be used to deploy the sample Cloud Run service, and
you also define the `service.yaml` file that defines the
Cloud Run itself.
1. Open a terminal window.
2. Create a new directory and navigate into it.
mkdir deploy-analysis-run-quickstart
cd deploy-analysis-run-quickstart
1. Create a file named `skaffold.yaml` with the following contents:
apiVersion: skaffold/v4beta7
kind: Config
manifests:
rawYaml:
- service.yaml
deploy:
cloudrun: {}
See the [`skaffold.yaml` reference](https://skaffold.dev/docs/references/yaml/)
for more information about this configuration file.
1. Create a file named `service.yaml`, with the following contents:
apiVersion: serving.knative.dev/v1
kind: Service
metadata:
name: my-analysis-run-service
annotations:
run.googleapis.com/scalingMode: manual
run.googleapis.com/manualInstanceCount: 0
spec:
template:
spec:
containers:
- image: my-app-image
This file is a Cloud Run service definition, which is used to
deploy the application. The container image to deploy is set here as a
placeholder, `my-app-image`, which is replaced with the specific image when you
[create the release](https://docs.cloud.google.com/deploy/docs/deploy-app-analysis#create_a_release).
Notice that we've set the scaling mode to manual, and the instance count to `0`.
This means that the deployed service won't be able to receive traffic and there
won't be any running instances, which will trigger an alert. You'll configure
that alert next.
## Create an alert policy
This quickstart uses a Google Cloud Observability alert policy. This alert policy
generates an alert when the Cloud Run service fails the uptime
check you created earlier.
1. In the `deploy-analysis-run-quickstart` directory, create a file called
`policy.yaml`, with the following contents:
displayName: Cloud Run service uptime check
userLabels:
policy-for: analysis-run-pipeline
combiner: OR
conditions:
- displayName: Failure of uptime check UPTIME_ID
conditionThreshold:
filter: metric.type="monitoring.googleapis.com/uptime_check/check_passed" AND metric.label.check_id="UPTIME_ID" AND resource.type="cloud_run_revision"
aggregations:
- alignmentPeriod: 60s
crossSeriesReducer: REDUCE_COUNT_FALSE
groupByFields:
- resource.label.*
perSeriesAligner: ALIGN_NEXT_OLDER
comparison: COMPARISON_GT
duration: 60s
thresholdValue: 1.0
Replace `UPTIME_ID` with the ID of the uptime check you created
[before](https://docs.cloud.google.com/deploy/docs/deploy-app-analysis#create-uptime-check).
2. Run the following command to create the policy:
gcloud monitoring policies create \
--policy-from-file=policy.yaml\
--project=PROJECT_ID
Replace `PROJECT_ID` with your project ID.
3. Copy the policy ID from the output of the command you just ran.
This time, copy the entire resource ID, including the path. You'll use this
ID in the next section, in the analysis configuration in your delivery
pipeline.
## Create your delivery pipeline and target
This delivery pipeline has one stage, for one target: `analysis-staging`.
> [!NOTE]
> **Note:** You can define targets in the same configuration file as your pipeline or in separate files. In this quickstart, you create a single file with the pipeline and target.
1. In the `deploy-analysis-run-quickstart` directory, create a new file,
`clouddeploy.yaml`, with the following contents:
apiVersion: deploy.cloud.google.com/v1
kind: DeliveryPipeline
metadata:
name: deploy-analysis-demo-app-run
description: main application pipeline
serialPipeline:
stages:
- targetId: analysis-staging
profiles: []
strategy:
standard:
analysis:
duration: 300s
googleCloud:
alertPolicyChecks:
- id: check-1
alertPolicies:
- ALERT_POLICY_ID
---
apiVersion: deploy.cloud.google.com/v1
kind: Target
metadata:
name: analysis-staging
description: staging Run service
run:
location: projects/PROJECT_ID/locations/us-central1
In this YAML, replace `ALERT_POLICY_ID` with the output from the `gcloud
monitoring policies list` command you ran [previously](https://docs.cloud.google.com/deploy/docs/deploy-app-analysis#create-alert-policy),
and replace `PROJECT_ID` with the ID of the project you're using.
2. Register your pipeline and target with the Cloud Deploy service:
gcloud deploy apply --file=clouddeploy.yaml --region=us-central1 --project=PROJECT_ID
You now have a delivery pipeline, with one target, ready to deploy your
application.
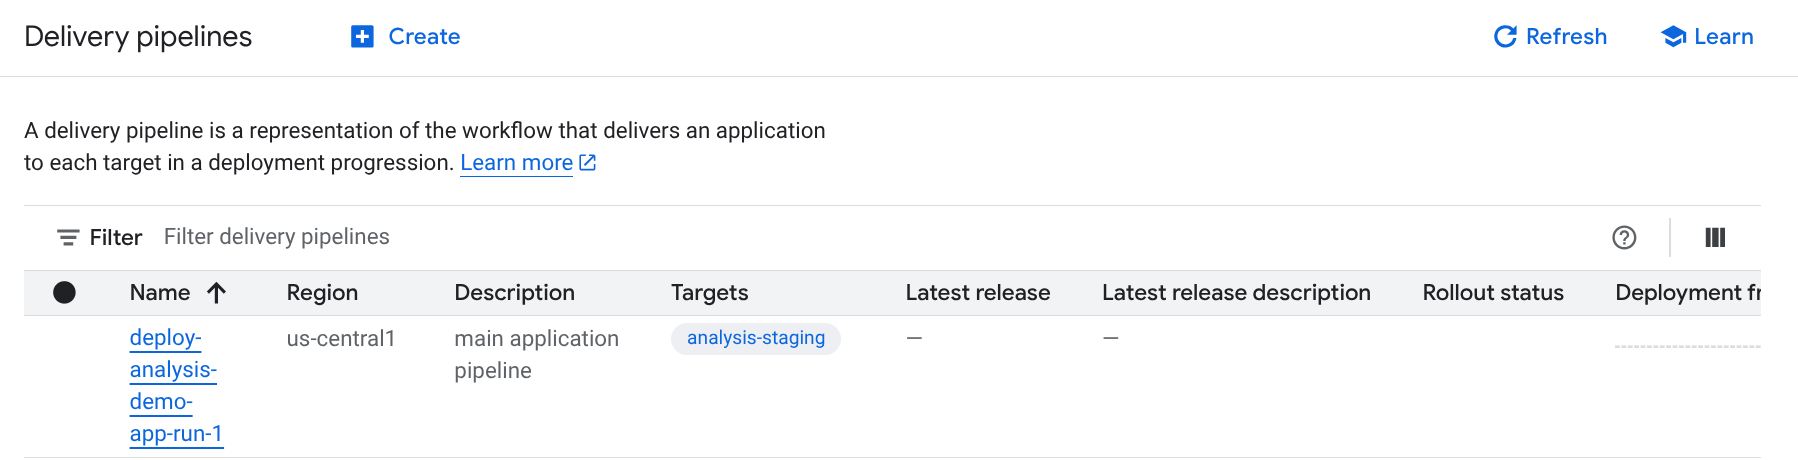
3. Confirm your pipeline and target:
In the Google Cloud console, navigate to the Cloud Deploy
**Delivery pipelines** page to view of list of your available delivery
pipelines.
[Open the Delivery pipelines page](https://console.cloud.google.com/deploy/delivery-pipelines)
The delivery pipeline you just created is shown, with one target listed in
the **Targets** column.
## Create a release
> [!NOTE]
> **Note:** this release is meant to fail. In a later step, you'll make a change and then create a new release, which should succeed.
A release is the central Cloud Deploy resource representing the
changes being deployed. The delivery pipeline defines the lifecycle of that
release. See
[Cloud Deploy service architecture](https://docs.cloud.google.com/deploy/docs/architecture#how_they_fit_together_to_deliver_your_release)
for details about that lifecycle.
Run the following command from the `deploy-analysis-run-quickstart` directory to
create a `release` resource that represents the container image to deploy:
gcloud deploy releases create test-release-001 \
--project=PROJECT_ID \
--region=us-central1 \
--delivery-pipeline=deploy-analysis-demo-app-run \
--images=my-app-image=us-docker.pkg.dev/cloudrun/container/hello@sha256:95ade4b17adcd07623b0a0c68359e344fe54e65d0cb01b989e24c39f2fcd296a
Notice the
[`--images=` flag](https://docs.cloud.google.com/sdk/gcloud/reference/deploy/releases/create#--images), which
you use to replace the placeholder (`my-app-image`) in the
[service definition](https://docs.cloud.google.com/deploy/docs/deploy-app-analysis#skaffold-and-service) with the specific, SHA-qualified
image. Google recommends that you templatize your service definitions this way,
and that you use SHA-qualified image names at release creation.
As with all releases (unless they include `--disable-initial-rollout`),
Cloud Deploy automatically creates a
[rollout](https://docs.cloud.google.com/deploy/docs/terminology#rollout) resource too. The application is
automatically deployed into the one target configured for this delivery
pipeline.
## View the results in Google Cloud console
After a few minutes, your release is deployed into your target runtime. You can
view it.
1. In the Google Cloud console, navigate to the Cloud Deploy
**Delivery pipelines** page to view your delivery pipeline
("deploy-analysis-demo-app-run").
[Open the Delivery pipelines page](https://console.cloud.google.com/deploy/delivery-pipelines)
2. Click the name of your delivery pipeline
("deploy-analysis-demo-app-run").
The pipeline visualization shows the app's deployment status. Because there's
only one stage in the pipeline, the visualization shows only one node.
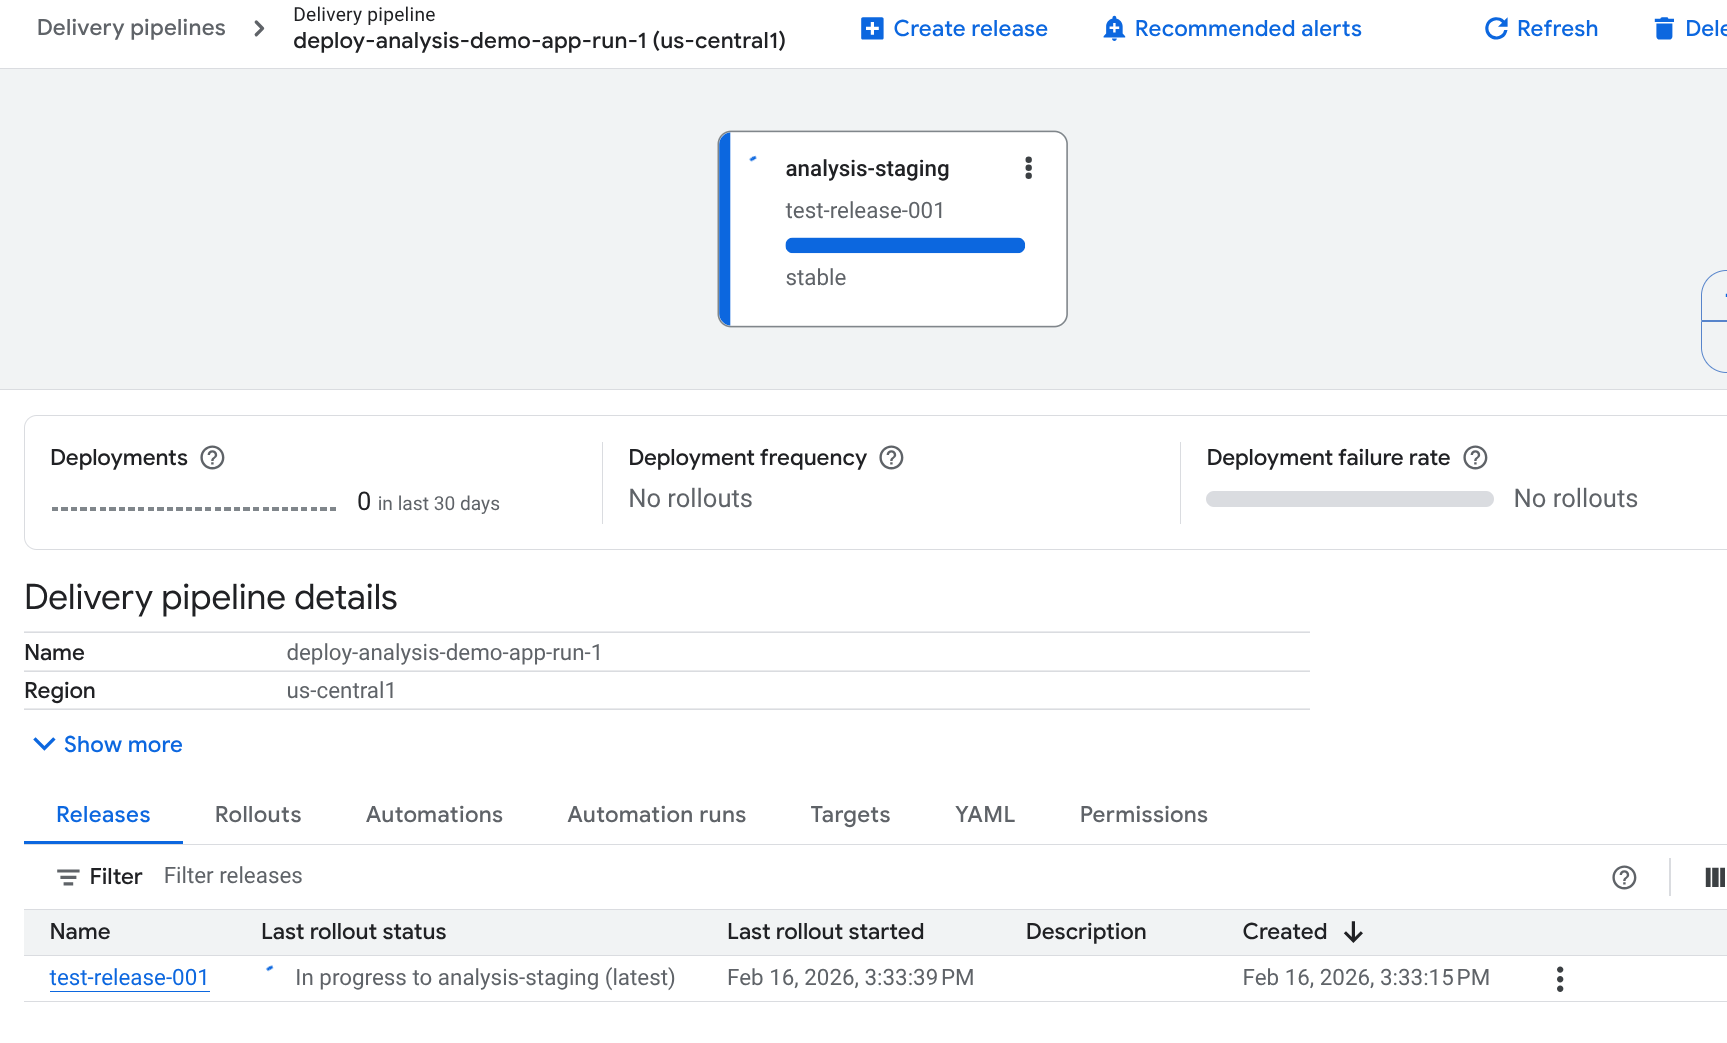
And your release is listed on the **Releases** tab under **Delivery pipeline
details**.
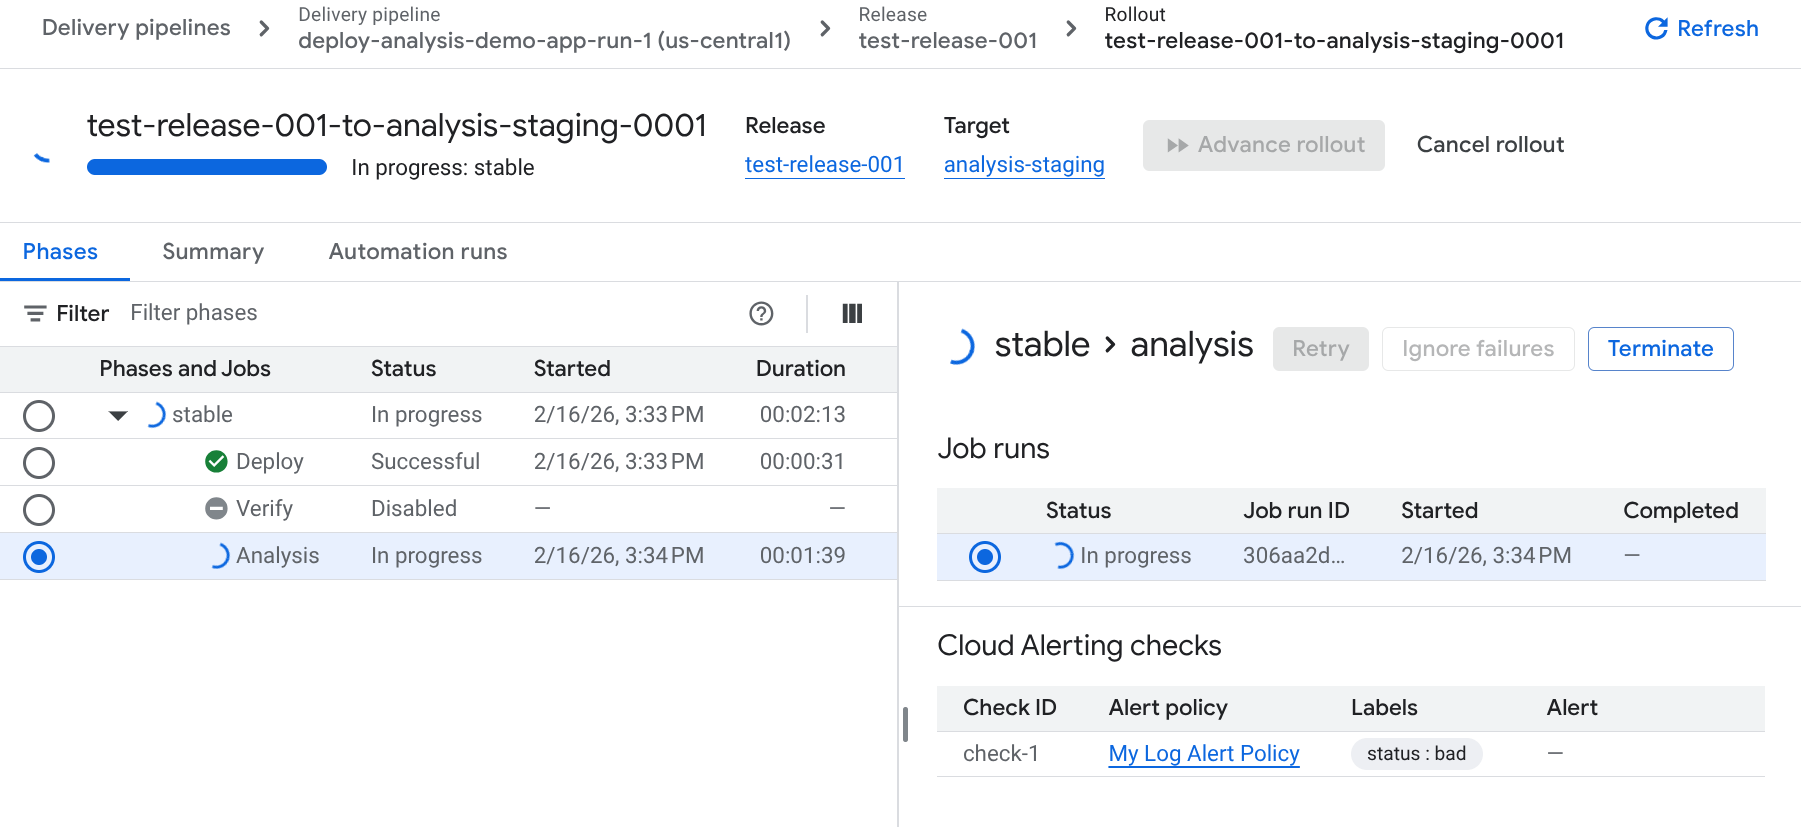
3. Click the **Rollouts** tab, under **Delivery pipeline details**.
4. Click the rollout name to view the rollout details.
**Analysis** is listed as a job.
### A failed analysis
The analysis job we specified in our delivery pipeline config runs as part of
this rollout, after the application is deployed. This analysis is meant to fail,
because the alert policy should fire an alert. The rollout will fail because of
this analysis failure.
We'll make a change, then create another release, which should then succeed.
## Change the service definition and create a new release
Now, we change the instance count in the service definition, so that there will
be a running instance of the service, and the alert won't be triggered.
1. Edit the Cloud Run definition file, `service.yaml`, to change
the value of `run.googleapis.com/manualInstanceCount` from `0` to `1`.
2. Run the following command from the same `deploy-analysis-run-quickstart`
directory to create another `release`:
gcloud deploy releases create test-release-002 \
--project=PROJECT_ID \
--region=us-central1 \
--delivery-pipeline=deploy-analysis-demo-app-run \
--images=my-app-image=us-docker.pkg.dev/cloudrun/container/hello@sha256:95ade4b17adcd07623b0a0c68359e344fe54e65d0cb01b989e24c39f2fcd296a
This time, the rollout should succeed. This is because your
Cloud Run service now has one running instance, so the uptime
check won't invoke an alert from the alert policy.
## Clean up
To avoid incurring charges to your Google Cloud account for
the resources used on this page, follow these steps.
1. Delete the Cloud Run service:
gcloud run services delete my-analysis-run-service \
--region=us-central1 \
--project=PROJECT_ID
2. To delete the delivery pipeline, target, release, and rollout, run the
following command from the directory containing your delivery pipeline
definition:
gcloud deploy delete --file=clouddeploy.yaml \
--force \
--region=us-central1 \
--project=PROJECT_ID
3. Delete the Google Cloud Observability alert policy:
gcloud monitoring policies delete ALERT_POLICY_ID
4. Delete the Cloud Storage buckets that Cloud Deploy created.
One ends with `_clouddeploy`, and the other is `[region].deploy-artifacts.[project].appspot.com`.
[Open the Cloud Storage browser page](https://console.cloud.google.com/storage/browser)
That's it, you completed this quickstart!
## What's next
- [Learn more about Cloud Deploy](https://docs.cloud.google.com/deploy/docs/overview).
- [Learn more about deploy analysis](https://docs.cloud.google.com/deploy/docs/analysis).